<p>Bonjour / Bonsoir à toutes et à tous !</p>
<p> </p>
<p>Aujourd'hui je vais vous expliquer la structure du fichier "s4_weapon.x4" qui est un des éléments essentiel du jeu.</p>
<p> </p>
<p><span style="color:#ff8c00;"><span style="font-size:24px;"><em><strong>Qu'est ce que s4_weapon.x4 ?</strong></em></span></span></p>
<p> </p>
<p>s4_weapon.x4 est un fichier regroupant les armes du jeu (logique) mais c'est aussi le fichier qui gère l’interprétation de celles-ci une fois dans le jeu / shop.</p>
<p>Ce fichier va permettre de fixer plusieurs choses (lisez bien tout c'est important pour la suite du développement) :</p>
<p> </p>
<ul><li>Le prix d'une arme (Seulement "l'affichage" car le prix qui sera soutiré au compte est fixé par la BDD => Base de donnée que nous irons voir plus tard dans un prochain tutoriel !)</li>
<li>La durabilité et la durée de l'achat avant disparition.</li>
<li>Où l'arme sera placé dans le shop</li>
<li>Définir si l'arme est "nouvelle" ou non</li>
<li>Le skin qui sera chargé sur l'arme (format .dds)</li>
<li>La forme sur laquelle sera "plaqué" le skin (format .scn)</li>
<li>Les dégâts de l'arme, la vitesse à laquelle on se déplace avec etc..</li>
<li>Description de l'arme, suivant les différents langages</li>
<li>Et d'autres propriétés que vous comprendrez par vous même si vous maîtrisez l'anglais !  </li></ul><p> </p>
<p><span style="font-size:24px;"><em><strong><span style="color:#ff8c00;">Comment obtenir ce fichier ?</span></strong></em></span></p>
<p> </p>
<p>Pour cela, vous devez avoir en possession le "Ressource Tool" que j'ai partagé par ici ! : <iframe data-embed-src="<base_url>/topic/1237-partage-ressource-outil-de-d%C3%A9veloppement/?do=embed" data-embedcontent="" frameborder="0" src="//melinyel.net/applications/core/interface/js/spacer.png"></iframe></p>
<p> </p>
<p>Puis, vous devez choisir votre dossier S4L pour charger les ressources dans un premier temps (Appuyez sur "Load" et chercher votre dossier S4L) :</p>
<p> </p>
<p><img alt="1414753735-ss-2014-10-31-at-12-07-13.png" src="<base_url>/applications/sslimageproxy/interface/image.php?url=http://image.noelshack.com/fichiers/2014/44/1414753735-ss-2014-10-31-at-12-07-13.png"/></p>
<p> </p>
<p>Une fois chargé, Allez dans le dossier "xml" et trouvez tout en bas le fichier s4_weapons.x4 et faites un save sur votre bureau avec un clic droit dessus :</p>
<p> </p>
<p><img alt="1414753694-99998f169e2.png" src="<base_url>/applications/sslimageproxy/interface/image.php?url=http://image.noelshack.com/fichiers/2014/44/1414753694-99998f169e2.png"/></p>
<p> </p>
<p>Vous n'avez plus qu'à l'ouvrir avec Notepad++ pour votre éditeur de texte préféré </p>
<p></p><p><strong><em><span style="font-size:24px;"><span style="color:#ff8c00;">Allez ! maintenant on regarde en détail avec un exemple d'arme dans ce fichier!</span></span></em></strong></p>
<pre class="ipsCode prettyprint">
<sub_category id="5">
<item number="1">
<product id="1" term_contract="NO_TIME_LIMIT" gm_price="40000" cash_price="0" durability_inital_value="2400" remaining_second="-1" refund_enable="true" />
<product id="2" term_contract="TS_5_HOURS" gm_price="5000" cash_price="0" durability_inital_value="-1" remaining_second="18000" refund_enable="true" />
<base name="그레네이드 건" require_level="0" exp_boost_percent="0" require_license="license_mine_gun" sale_mode="0" />
<client icon_image="Resources/Image/Weapon/icon_gun_mine.tga" attrib_comment="{A-L}{F-2002_12}볼 형태로 압축된 폭발성 에너지를{N}원하는 타이밍에 투척할 수 있도록{N}제작한 무기. 신체와 물체에 닿을 시{N}폭발하도록 설계되어 있다.{N}포물선으로 날아가는 에너지 볼의 {N}궤적을 연구할 필요가 있다.{N}{CB-0,255,0,255}[조작법]{N}마우스 왼쪽 버튼 : 에너지볼 발사{N}{CB-255,0,0,255}시범무기로써 라이센스로 획득한 무기만{N}사용할 수 있습니다.{N}추후 밸런스 조정 가능성이 있습니다." feature_comment="투척 무기" />
<license script_file="license_MineGun.lua" script_func="OnMineGunLicenseTest" license_map="104" />
<attach />
<weapon type="10" rate_of_fire="" power="45.0" move_speed_rate="1.0" attack_move_speed_rate="1.0" magazine_capacity="1" cracked_magazine_capacity="1" max_ammo="4" accuracy="" range="500.0" support_sniper_mode="0" sniper_mode_fov="15" reload_sound_file="Resources/Sound/grenade_reload.ogg" slot_image_file="Resources/Image/Weapon/slot_gun_mine.tga" crosshair_file="Resources/Image/Weapon/crosshair_gun_mine" crosshair_zoomin_file="Resources/Image/Weapon/crosshair_gun_mine" auto_target_distance="0.0">
<scene value="resources/Model/Weapon/minegun.scn" />
</weapon>
<lang>
<nation id="2" name_code="Mine Gun" attrib_comment_code="{A-L}{F-2002_12}Waffe, die zur gewünschten Zeit mit{N}konzentrierter Energie in Ballform angreift.{N}Eingerichtet, um bei physischem Kontakt zu{N}explodieren. Die Flugformation des Energieballs ist {N}noch unerforscht.{N}{CB-0,255,0,255}[Anwendung]{N}Linke Maustaste: Energieball abschießen{N}{CB-255,0,0,255}Dies ist eine befristete Waffe, die nur{N}durch den License Test erworben werden kann.{N}Spätere Änderungen zur Anpassung möglich." feature_comment_code="Throwing Weapon" />
<nation id="3" name_code="Mine Gun" attrib_comment_code="{A-L}{F-2002_12}Weapon with compressed explosive energy{N}in ball form for carefully timed sniping. It is made to{N}explode on physical contact. Research into the{N}flight of the ball is essential.{N}{CB-0,255,0,255}[Operation]{N}Click left mouse button: Fire weapon.{N}{CB-255,0,0,255}This is a temporary weapon{N}which can only be used by acquiring a weapons license.{N}Balance adjustment might be required afterwards." feature_comment_code="Throwing Weapon" />
<nation id="4" name_code="Mine Gun" attrib_comment_code="{A-L}{F-2002_12}Arme avec de l'énergie explosive compressée{N}sous la forme d'une balle pour tirer selon un timing précis. Elles sont faites{N}pour exploser au contact physique. Des recherches{N}sur le comportement de l'energyball sont nécessaires.{N}{CB-0,255,0,255}[Utilisation]{N}Clic gauche: tirer {N}{CB-255,0,0,255}C'est une arme temporaire{N}qui peut uniquement être utilisée pendant la licence{N}Des ajustements pourraient être nécessaires." feature_comment_code="Throwing Weapon" />
<nation id="5" name_code="Mine Gun" attrib_comment_code="{A-L}{F-2002_12}Weapon with compressed explosive energy{N}in ball form for sniping on desired timing. It is made{N}to explode on physical contact. Research of the{N}energyball flight formation is needed.{N}{CB-0,255,0,255}[Controls]{N}Left mouse button : Fire energyball {N}{CB-255,0,0,255}This is a temporary weapon{N}which can only be used by license acquired weapons{N}Balance adjustment might be required afterwards." feature_comment_code="Throwing Weapon" />
<nation id="6" name_code="Mine Gun" attrib_comment_code="{A-L}{F-2002_12}Arma ad energia compressa in una sfera{N}che esplode in un momento preciso.{N}Esplode a contatto. Fai attenzione{N}alla sua traettoria.{N}{CB-0,255,0,255}[Comandi]{N}Tasto sinistro: spara la energyball{N}{CB-255,0,0,255}Arma temporanea{N}da usare con armi di cui si ha la licenza.{N}Può essere necessario ribilanciarle." feature_comment_code="Throwing Weapon" />
<nation id="7" name_code="Mine Gun" attrib_comment_code="{A-L}{F-2002_12}Оружие со спресованной в шар{N}взрывной энергией для точных выстрелов с учетом{N}поправки на траекторию. Взрывается при физическом{N}контакте с противником.{N}{CB-0,255,0,255}[Управление]{N}Левая кнопка мыши: выстрелить шаром{N}{CB-255,0,0,255}Это временное оружие,{N}получить которое можно только через{N}Лицензию. Проводится балансировка." feature_comment_code="Throwing Weapon" />
</lang>
</item>
</pre>
<p>Place à l'explication de ce qui figure dans ce fichier !  </p>
</p>
<p> </p>
<p><u>sub_category :</u> sous catégorie de l'arme. (Les armes ont toutes une Category de "2" qui correspond aux armes)</p>
<pre class="ipsCode prettyprint">
sub_category id="0" => Armes au corps à corps
sub_category id="1" => Armes à distance (Légères Automatiques & Semi automatiques)
sub_category id="2" => Armes à distance (Lourdes Automatiques & Semi automatiques)
sub_category id="3" => Armes à longue distance (Snipers)
sub_category id="4" => Armes stationnaires (SentyNell, SentryGun)
sub_category id="5" => Armes de lancer (Il n'y en a qu'une à cette version, le MineGun, lance grenade)
sub_category id="6" => Armes "autres" (MindEnergy, MindShock)
</pre>
<p><u>item_number :</u> ID unique de l'objet dans la sub_category (il ne peut pas y avoir deux fois un item_number "1" dans une même sub category)</p>
<p> </p>
<p><u>product_id :</u> Ceci correspond à l'ensemble des propriétés du produit dans le shop (Si vous voulez ajouter cette arme au shop (j'expliquerais comment dans un autre tutoriel) avec le product id 1, cela chargera donc toutes les propriétés à droite de ce product_id)</p>
<p> </p>
<p><u>weapon_type :</u> Type de l'arme (c'est défini dans les .lua du jeu, je vous conseille de ne pas y toucher sans une maîtrise complète du langage lua, sinon tout le jeu ne marchera plus normalement ..)</p>
<p> </p>
<p><u>scene value :</u> Valeur de ce qu'on appelle la "scène" qui correspond à la forme de l'arme, ainsi que d'autres propriétés telles que des animations, ou une éventuelle transparence. (Tout ceci est contenu dans un fichier .scn)</p>
<p> </p>
<p>Et là vous allez me dire (si vous avez lu en haut) mais où est la texture qui est censé être juste en dessous de la scène ? Et bien c'est tout simple il ne demande pas d'en charger.</p>
<p>Pourquoi ?</p>
<p>Si vous n'indiquez pas de texture à l'arme avec un texture_suffix diffuse, le jeu va donc comprendre que la texture porte le même nom que le .scn chargé plus haut, et donc la charger automatiquement</p>
<p>Si vous vouliez charger une autre texture pour cette arme, voilà ce qu'il faudrait avoir :</p>
<pre class="ipsCode prettyprint">
<scene value="resources/Model/Weapon/minegun.scn">
<texture_suffix diffuse="_1" />
</scene>
</pre>
<p>et dans le cas là, la texture chargée sera minegun_1.dds et non dans le cas précédent minegun.dds</p>
<p> </p>
<p><u>nation_id :</u> ID de la région, et donc des textes chargés.</p>
<p>Pour les plus curieux d'entre vous, vous aurez remarqué d'ailleurs que ce chiffre figure dans le Launcher que je vous ai mis dans le dossier S4League :</p>
<p> </p>
<p><img alt="1414753355-bf07ff84d32.png" src="<base_url>/applications/sslimageproxy/interface/image.php?url=http://image.noelshack.com/fichiers/2014/44/1414753355-bf07ff84d32.png"/></p>
<p> </p>
<p>Si vous voulez changer la langue chargée au démarrage du jeu, changez juste le "3" qui correspond à l'anglais en "4" pour français. </p>
<p> </p>
<p>Voilà j'ai fini de vous expliquer les détails de ce fichier pour pouvaient pour paraître un peu "flou"</p>
<p>Si vous avez des remarques, suggestions, ou que vous aimeriez que je détail autre chose, n'hésitez pas ! </p>
World
Topics from outside of this forum. Views and opinions represented here may not reflect those of this forum and its members.
A world of content at your fingertips…
Think of this as your global discovery feed. It brings together interesting discussions from across the web and other communities, all in one place.
While you can browse what's trending now, the best way to use this feed is to make it your own. By creating an account, you can follow specific creators and topics to filter out the noise and see only what matters to you.
Ready to dive in? Create an account to start following others, get notified when people reply to you, and save your favorite finds.
Register Login-
-
<p>Bonjour, j'ai réalisé un petit projet qui a pour objectif de permettre à quelqu'un de réaliser une todolist.</p><p> Le lien de l'exécutable : <a class="attach-link" href="<base_url>/applications/core/interface/file/attachment.php?id=281">todolist.tar.gz</a></p><p>Avec ce petit soft en console, vous pouvez :</p><p>*créer une todolist</p><p>*visualiser votre todolist</p><p>*supprimer votre todolist</p><p>*modifier votre todo list, en passant l'état de la tâche de 0 à 1, vous indiquez que vous avez finis cette tache.</p><p>A vous de tester :), le logiciel devrait être portable logiquement!</p><p>--</p><p>Execution : ./agenda</p>
-
<p>Bonjour tout le monde,</p>
<p>J'ai récemment découvert OpenNIC, une racine DNS alternative, pendant mes bidouillages de week-end.</p>
<p>Comme le projet m'a semblé fort intéressant je me suis dit que créer un rapide sujet de présentation pourrait être une bonne idée.</p>
<p> </p>
<p>OpenNIC est en fait une organisation qui propose des serveurs DNS indépendants implantés un peu partout dans le monde.</p>
<p>Les serveurs sont vraiment rapides, et il suffit de se rendre sur <a href="http://www.opennicproject.org/" rel="external nofollow">le site du projet</a> pour qu'il vous renseigne sur les serveurs les plus proches.</p>
<p>En cliquant sur le gros bouton bleu, le site vous détaillera les procédures permettant d'utiliser leurs serveurs sous différents OS.</p>
<p> </p>
<p>Bien, voilà pour la présentation, maintenant le plus drôle : en tant que DNS indépendant, tous les bidouillages étaient permis à leurs créateurs </p>
<p>Ils ne se sont donc pas privés : en plus de résoudre les noms de domaines "officiels" enregistrés auprès des registrars approuvés par l'ICANN,</p>
<p>OpenNIC fournit des noms de domaine de premier niveau qui n'existent pas sur les DNS globaux, et ce <u>gratuitement</u> </p>
</p>
<p>Alors certes, ils ne fonctionnent que pour les utilisateurs de OpenNIC, mais c'est quand même super cool, surtout si on regarde les extensions :</p>
<p>.bbs<br/>
.dyn<br/>
.free<br/>
.fur<br/>
.geek<br/>
.gopher<br/>
.indy<br/>
.ing<br/>
.micro<br/>
.neo<br/>
.null<br/>
.oss<br/>
.oz<br/>
.parody</p>
<p>.pirate <strong><span style="color:#ff0000;"><3</span></strong></p>
<p> </p>
<p>A noter que tous ne sont pas fonctionnels. Pour en enregistrer un, il faut avant tout vous <a href="http://www.opennicproject.org/members/" rel="external nofollow">créer un compte sur OpenNIC</a>.</p>
<p>Ensuite, ça se passe sur <a href="http://www.opennicproject.org/" rel="external nofollow">le site du projet</a>, dans le menu TLDs : cliquez sur le NDD que vous souhaitez obtenir et connectez-vous avec vos identifiants OpenNIC.</p>
<p> </p>
<p>Maintenant la question magique : qui veut un .pirate ?!</p>
<p>L'extension n'est pas disponible dans la liste du site d'OpenNIC, mais pas d'inquiétude c'est un oubli de leur part (elle a été abandonnée un moment, mais est enfin à nouveau proposée)</p>
<p><a href="http://dotpirate.org/" rel="external nofollow">Rendez-vous ici</a> pour les flibustiers en titre </p>
</p>
-
<p><span style="color:#808080;"><em>Bonjour, je suis Alexis, j'ai 18 ans, je suis actuellement en Terminale Sti2d(itec), j'envisage de rentrer dans un DUT informatique l'année prochaine. Je programme en C depuis quelques années, mais je ne suis jamais allé bien loin par manque de temps ...Mais cette fois-ci, je me suis dit que j'allais me lancer dans un gros projet qui me permettra d'apprendre beaucoup de choses.</em></span><br/>
<br/><span style="font-size:24px;"><strong>Genèse</strong></span><br/>
Ce projet à vue le jour cette année, j'avais besoin d'un projet, d'un objectif à partir du moment ou je recommençais la programmation. Si on ne s'exerce pas on ne va jamais bien loin bien souvent. J'ai eu envie de réaliser un jeu moi-même et être présent sur toutes les étapes de sa conception.<br/>
<br/><span style="font-size:24px;"><strong>Généralités et avancement</strong></span><br/>
Commencement du programme informatique : 14/02/2014<br/>
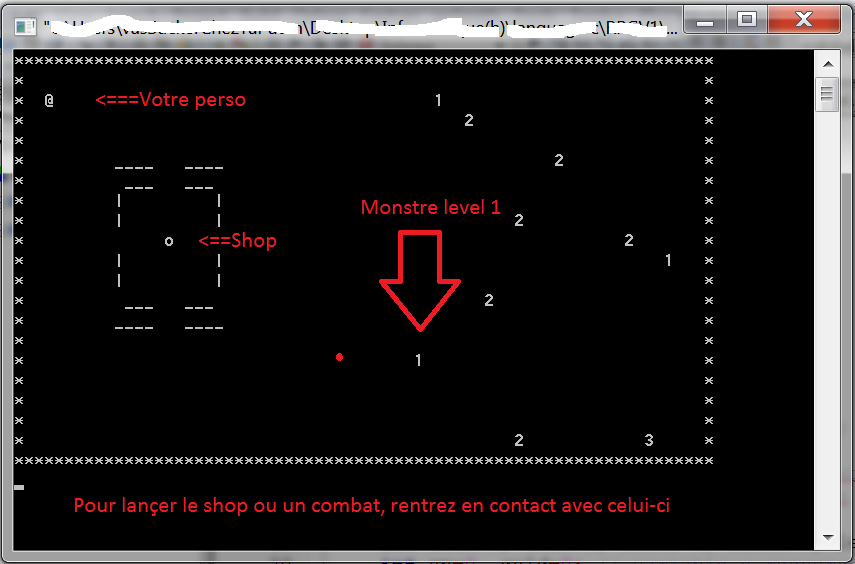
Ce programme a pour but de proposer un petit jeu en console dans le style d'un RPG(Role-Playing Game)<br/>
Pour le moment, le joueur à la possibilité de se déplacer sur une map réalisé avec les caractères du clavier à l'aide des touches fléchées pour aller combattre des monstres de différents levels, il a la possibilité d'acheter des équipements à partir du level 1 !<br/>
<br/>
-système de combat : Quatres attaques de disponible (attaque et soin)<br/>
-Les monstres peuvent seulement attaquer<br/>
-système de shop : 20 items différents, deux nouveaux à chaque nouveau level<br/>
-monstres : 10 monstres différents <br/>
-map : 4* 70*21 caractères.<br/><span style="color:#339966;"> </span><br/>
<br/>
<br/><span style="font-size:24px;"><strong>Objectifs</strong></span><br/><strong>Pour la prochaine mise à jours:</strong><br/><strong>-système de gain de ressource, de confection d'équipement</strong><br/><strong>-possibilité de vendre ses ressources</strong><br/><strong>et d'autres petit ajout <img alt="clin.png" src="<base_url>/applications/sslimageproxy/interface/image.php?url=http://fr.openclassrooms.com/bundles/tinymce/vendor/tiny_mce/plugins/emotions/img/clin.png"/></strong><br/>
<br/><span style="font-size:24px;"><strong>Pour jouer:</strong></span><br/>
Les touches flêché servent à se déplacer<br/>
-La touche "s" permets de consulter ses stats<br/><img alt="tuto8.png" src="https://sdz-upload.s3.amazonaws.com/prod/upload/tuto8.png"/><br/>
Pour le télécharger:<br/>
v: 0.2(dimanche 09/03/2013<br/>
<a href="http://toutbox.fr/hhelsonalexis/Documents/rpg+v0.2" rel="external nofollow">http://toutbox.fr/hhelsonalexis/Documents/rpg+v0.2</a><br/>
v: 0.1(vendredi 07/03/2014)<br/>
<a href="http://fr.openclassrooms.com/forum/sujet/RPG 0.1" rel="external nofollow"> http://toutbox.fr/hhelsonalexis/Documents</a><br/>
Pour lancer le jeu, mettez les deux fichier dans le même documents <img alt="clin.png" src="<base_url>/applications/sslimageproxy/interface/image.php?url=http://fr.openclassrooms.com/bundles/tinymce/vendor/tiny_mce/plugins/emotions/img/clin.png"/> sinon vous aurez un problème de dll.<br/>
</p>
<p> </p>
<p><span style="color:#ff0000;"><span style="font-size:18px;"><span style="font-family:'courier new', courier, monospace;">Amélioration du contenu existant:</span></span></span></p>
<p><span style="color:#ffa500;"><span style="font-family:'courier new', courier, monospace;"> -Enlever le système de fermeture automatique de a fenêtre</span></span></p>
<p><span style="color:#ffa500;"><span style="font-family:'courier new', courier, monospace;"> -Améliorer la rapidité des combats</span></span></p>
<p><span style="color:#ffa500;"><span style="font-family:'courier new', courier, monospace;"> -Amélioration de la présentation</span></span></p>
<p> </p>
<p><span style="font-size:24px;"><span style="color:#008000;"><strong>Mot de la fin:</strong></span></span><br/>
C'est mon premier gros projet, j'aimerais des retours constructifs<br/>
ps: Je sais pas encore si je mettrais mon jeu en Anglais ou en Français c'est pour ça qu'il y a des mots dans les deux langues <img alt="clin.png" src="<base_url>/applications/sslimageproxy/interface/image.php?url=http://fr.openclassrooms.com/bundles/tinymce/vendor/tiny_mce/plugins/emotions/img/clin.png"/><br/>
Bonne journée <img alt="smile.png" src="<base_url>/applications/sslimageproxy/interface/image.php?url=http://fr.openclassrooms.com/bundles/tinymce/vendor/tiny_mce/plugins/emotions/img/smile.png"/></p>
-
<p>Bonjour,</p><p>Voilà, je suis confronté à problème technique. J'utilise EF dans mon développement d'une application C#.</p><p>Je ne sais si je suis au bon endroit pour poser ma question, mais je la pose on ne sait jamais.</p><p>J'aimerai savoir comment puis-je récupérer (par des Get) des données par lot de 100 par exemple. En fait c'est pour éviter de charger tout le contenu d'une BD en une fois comme le fais EF.</p><p>Merci d'avance.</p>
-
<p>Bonjour , je tien a précisé que ce tuto ne viens pas de moi mais de Forum Bulldog : <span style="font-size:14px;"><a href="http://www.altisliferpg.com/topic/4375-modifyextended-admin-menu/" rel="external nofollow">http://www.altisliferpg.com/topic/4375-modifyextended-admin-menu/</a></span><br/>
<br/>
Commençons tout de suite : <br/>
<br/>
<br/>
1 . Commencer par aller dans votre base de donnée dans players puis structure puis cherché adminlevel , et rajouté 2 grade admin cela devrait ressemblé à ça :</p>
<pre class="ipsCode prettyprint">
'0','1','2','3','4','5'
</pre>
<p>2 . Aller dans Function.h (qui se trouve a la racine de votre mission) et modifié la Class Admin</p>
<pre class="ipsCode prettyprint">
class Civilian
{
file = "core\civilian";
class freezePlayer {};
};
class Admin
{
file = "core\admin";
class admininfo {};
class adminid {};
class admingetID {};
class adminMenu {};
class adminQuery {};
class adminSpectate {};
class adminTeleport {};
class adminTpHere {};
class adminDebugCon {};
class adminCompensate {};
class adminGodMode {};
class adminFreeze {};
class adminMarkers {};
};
</pre>
<p>3 . Aller dans stringtable.xml (Qui se trouve à la racine de votre mission) et modifié Admin Menu</p>
<pre class="ipsCode prettyprint">
<Key ID="STR_Admin_Spectate">
<Original>Spectate</Original>
<English>Spectate</English>
<German>Zuschauen</German>
<French>Regardez</French>
</Key>
<Key ID="STR_Admin_Teleport">
<Original>Teleport</Original>
<English>Teleport</English>
<German>Teleport</German>
<French>Teleport</French>
</Key>
<Key ID="STR_Admin_TpHere">
<Original>TP Here</Original>
<English>TP Here</English>
<German>TP Hier</German>
<French>TP Ici</French>
</Key>
<Key ID="STR_Admin_Debug">
<Original>Debug</Original>
<English>Debug</English>
<German>Debug</German>
<French>Debug</French>
</Key>
<Key ID="STR_Admin_Compensate">
<Original>Comp</Original>
<English>Comp</English>
<German>Comp</German>
<French>Comp</French>
</Key>
<Key ID="STR_Admin_God">
<Original>GodMode</Original>
<English>GodMode</English>
<German>Gott</German>
<French>Dieu</French>
</Key>
<Key ID="STR_Admin_Freeze">
<Original>Freeze</Original>
<English>Freeze</English>
<German>Freeze</German>
<French>Geler</French>
</Key>
<Key ID="STR_Admin_Markers">
<Original>Markers</Original>
<English>Markers</English>
<German>Markers</German>
<French>Markers</French>
</Key>
<Key ID="STR_ANOTF_CompWarn">
<Original>You are about to give yourself $%1 to compensate to another player <br/><br/>You must give this cash to the person you are compensating manually.</Original>
<English>You are about to give yourself $%1 to compensate to another player <br/><br/>You must give this cash to the person you are compensating manually.</English>
<German>To Be Changed</German>
<French>Vous êtes sur le point de vous donner $%1 pour compenser à un autre joueur <br/><br/> S'il vous plaît donner à cette à la personne vous compensez manuellement</French>
</Key>
<Key ID="STR_ANOTF_Success">
<Original>You have added $%1 to your account.</Original>
<English>You have added $%1 to your account.</English>
<German>To Be Changed</German>
<French>Vous avez ajouté $%1 à votre compte</French>
</Key>
<Key ID="STR_ANOTF_Fail">
<Original>You can not go above 999999.</Original>
<English>You can not go above 999999.</English>
<German>To Be Changed</German>
<French>Vous ne pouvez pas aller au-dessus $999999</French>
</Key>
<Key ID="STR_ANOTF_Amount">
<Original>Please type in the amount to compensate.</Original>
<English>Please type in the amount to compensate.</English>
<German>To Be Changed</German>
<French>S'il vous plaît entrer la quantité pour compenser</French>
</Key>
<Key ID="STR_ANOTF_Frozen">
<Original>You have disabled %1's input.</Original>
<English>You have disabled %1's input.</English>
<German>To Be Changed</German>
<French>Vous avez désactivé %1's contrôles</French>
</Key>
<Key ID="STR_ANOTF_Unfrozen">
<Original>You have enabled %1's input.</Original>
<English>You have enabled %1's input.</English>
<German>To Be Changed</German>
<French>Vous avez permis %1's contrôles</French>
</Key>
<Key ID="STR_ANOTF_Error">
<Original>You can't do that dumbass.</Original>
<English>You can't do that dumbass.</English>
<German>To Be Changed</German>
<French>Vous ne pouvez pas le faire sur vous-même</French>
</Key>
<Key ID="STR_ANOTF_ErrorLevel">
<Original>Your Admin Level is not high enough.</Original>
<English>Your Admin Level is not high enough.</English>
<German>To Be Changed</German>
<French>Votre Niveau admin n'est pas suffisamment élevée</French>
</Key>
<Key ID="STR_ANOTF_MDisabled">
<Original>Player Markers Disabled.</Original>
<English>Player Markers Disabled.</English>
<German>To Be Changed</German>
<French>Needs Translation</French>
</Key>
<Key ID="STR_ANOTF_MEnabled">
<Original>Player Markers Enabled.</Original>
<English>Player Markers Enabled.</English>
<German>To Be Changed</German>
<French>Needs Translation</French>
</Key>
<Key ID="STR_NOTF_ActionCancel">
<Original>Action Cancelled</Original>
<English>Action Cancelled</English>
<German>Aktion abgebrochen</German>
<French>Action Annulée</French>
</Key>
<Key ID="STR_Global_Yes">
<Original>Yes</Original>
<English>Yes</English>
<German>Ja</German>
<French>Oui</French>
</Key>
<Key ID="STR_Global_No">
<Original>No</Original>
<English>No</English>
<German>Nein</German>
<French>Aucun</French>
</Key>
</pre>
<p>4 . Toujours dans le même fichier juste en dessous Modifié Notification admin </p>
<pre class="ipsCode prettyprint">
<Key ID="STR_NOTF_Frozen">
<Original>You have been frozen by an administrator</Original>
<English>You have been frozen by an administrator</English>
<German>To Be Changed</German>
</Key>
<Key ID="STR_NOTF_Unfrozen">
<Original>You have been unfrozen by an administrator</Original>
<English>You have been unfrozen by an administrator</English>
<German>To Be Changed</German>
</Key>
</pre>
<p>5 . <strong>dialog\admin_menu.hpp</strong></p>
<pre class="ipsCode prettyprint">
class life_admin_menu {
idd = 2900;
name= "life_admin_menu";
movingEnable = false;
enableSimulation = true;
onLoad = "[] spawn life_fnc_adminMenu;";class controlsBackground { class Life_RscTitleBackground:Life_RscText { colorBackground[] = {"(profilenamespace getvariable ['GUI_BCG_RGB_R',0.3843])", "(profilenamespace getvariable ['GUI_BCG_RGB_G',0.7019])", "(profilenamespace getvariable ['GUI_BCG_RGB_B',0.8862])", "(profilenamespace getvariable ['GUI_BCG_RGB_A',0.7])"}; idc = -1; x = 0.1; y = 0.2; w = 0.8; h = (1 / 25); }; class MainBackground:Life_RscText { colorBackground[] = {0, 0, 0, 0.7}; idc = -1; x = 0.1; y = 0.2 + (11 / 250); w = 0.8; h = 0.6 - (2 / 250); }; }; class controls { class Title : Life_RscTitle { colorBackground[] = {0, 0, 0, 0}; idc = 2901; text = "$STR_Admin_Title"; x = 0.1; y = 0.2; w = 0.6; h = (1 / 25); }; class PlayerList_Admin : Life_RscListBox { idc = 2902; text = ""; sizeEx = 0.035; //colorBackground[] = {0,0,0,0}; onLBSelChanged = "[_this] spawn life_fnc_adminQuery"; x = 0.12; y = 0.26; w = 0.30; h = 0.4; }; class PlayerBInfo : Life_RscStructuredText { idc = 2903; text = ""; x = 0.42; y = 0.25; w = 0.35; h = 0.6; }; class CloseButtonKey : Life_RscButtonMenu { idc = -1; text = "$STR_Global_Close"; onButtonClick = "closeDialog 0;"; x = -0.06 + (6.25 / 40) + (1 / 250 / (safezoneW / safezoneH)); y = 0.88 - (1 / 25); w = (6.25 / 40); h = (1 / 25); }; class AdminID : Life_RscButtonMenu { idc = -1; text = "$STR_Admin_GetID"; onButtonClick = "[] call life_fnc_admingetID;"; x = 0.1 + (6.25 / 40) + (1 / 250 / (safezoneW / safezoneH)); y = 0.88 - (1 / 25); w = (6.25 / 40); h = (1 / 25); }; class Compensate : Life_RscButtonMenu { idc = 2904; text = "$STR_Admin_Compensate"; onButtonClick = "createDialog ""Life_Admin_Compensate"";"; x = 0.26 + (6.25 / 40) + (1 / 250 / (safezoneW / safezoneH)); y = 0.88 - (1 / 25); w = (6.25 / 40); h = (1 / 25); }; class Spectate : Life_RscButtonMenu { idc = 2905; text = "$STR_Admin_Spectate"; onButtonClick = "[] call life_fnc_adminSpectate;"; x = 0.42 + (6.25 / 40) + (1 / 250 / (safezoneW / safezoneH)); y = 0.88 - (1 / 25); w = (6.25 / 40); h = (1 / 25); }; class Teleport : Life_RscButtonMenu { idc = 2906; text = "$STR_Admin_Teleport"; onButtonClick = "[] call life_fnc_adminTeleport; hint 'Select where you would like to teleport';"; x = 0.58 + (6.25 / 40) + (1 / 250 / (safezoneW / safezoneH)); y = 0.88 - (1 / 25); w = (6.25 / 40); h = (1 / 25); }; class TeleportHere : Life_RscButtonMenu { idc = 2907; text = "$STR_Admin_TpHere"; onButtonClick = "[] call life_fnc_adminTpHere;"; x = -0.06 + (6.25 / 40) + (1 / 250 / (safezoneW / safezoneH)); y = 0.885; w = (6.25 / 40); h = (1 / 25); }; class God : Life_RscButtonMenu { idc = 2908; text = "$STR_Admin_God"; onButtonClick = "[] call life_fnc_adminGodMode;"; x = 0.1 + (6.25 / 40) + (1 / 250 / (safezoneW / safezoneH)); y = 0.885; w = (6.25 / 40); h = (1 / 25); }; class Freeze : Life_RscButtonMenu { idc = 2909; text = "$STR_Admin_Freeze"; onButtonClick = "[] call life_fnc_adminFreeze;"; x = 0.26 + (6.25 / 40) + (1 / 250 / (safezoneW / safezoneH)); y = 0.885; w = (6.25 / 40); h = (1 / 25); }; class Markers : Life_RscButtonMenu { idc = 2910; text = "$STR_Admin_Markers"; onButtonClick = "[] spawn life_fnc_adminMarkers;"; x = 0.42 + (6.25 / 40) + (1 / 250 / (safezoneW / safezoneH)); y = 0.885; w = (6.25 / 40); h = (1 / 25); }; class Debug : Life_RscButtonMenu { idc = 2911; text = "$STR_Admin_Debug"; onButtonClick = "hint 'Disabled';"; x = 0.58 + (6.25 / 40) + (1 / 250 / (safezoneW / safezoneH)); y = 0.885; w = (6.25 / 40); h = (1 / 25); }; };};
</pre>
<p>6 . <strong>dialog\compensate.hpp</strong></p>
<pre class="ipsCode prettyprint">
class Life_Admin_Compensate {
idd = 9920;
name= "life_admin_compensate_give";
movingEnable = false;
enableSimulation = true;
onLoad = "[] spawn {waitUntil {!isNull (findDisplay 9920)}; ((findDisplay 9920) displayCtrl 9921) ctrlSetText localize ""STR_Admin_Amount""};";class controlsBackground { class Life_RscTitleBackground:Life_RscText { colorBackground[] = {"(profilenamespace getvariable ['GUI_BCG_RGB_R',0.3843])", "(profilenamespace getvariable ['GUI_BCG_RGB_G',0.7019])", "(profilenamespace getvariable ['GUI_BCG_RGB_B',0.8862])", "(profilenamespace getvariable ['GUI_BCG_RGB_A',0.7])"}; idc = -1; x = 0.1; y = 0.2; w = 0.5; h = (1 / 25); }; class MainBackground:Life_RscText { colorBackground[] = {0, 0, 0, 0.7}; idc = -1; x = 0.1; y = 0.2 + (11 / 250); w = 0.5; h = 0.3 - (22 / 250); }; }; class controls { class InfoMsg : Life_RscStructuredText { idc = 9921; sizeEx = 0.020; text = ""; x = 0.1; y = 0.25; w = 0.5; h = 0.11; }; class Title : Life_RscTitle { colorBackground[] = {0, 0, 0, 0}; idc = -1; text = "$STR_Admin_Compensate"; x = 0.1; y = 0.2; w = 0.5; h = (1 / 25); }; class AdminCloseComp : Life_RscButtonMenu { idc = -1; text = "$STR_Global_Close"; onButtonClick = "closeDialog 0;"; x = -0.06 + (6.25 / 40) + (1 / 250 / (safezoneW / safezoneH)); y = 0.5 - (1 / 25); w = (6.25 / 40); h = (1 / 25); }; class AdminCompensVer : Life_RscButtonMenu { idc = -1; text = "$STR_Admin_Compensate"; colorBackground[] = {"(profilenamespace getvariable ['GUI_BCG_RGB_R',0.3843])", "(profilenamespace getvariable ['GUI_BCG_RGB_G',0.7019])", "(profilenamespace getvariable ['GUI_BCG_RGB_B',0.8862])", 0.5}; onButtonClick = "[] spawn life_fnc_adminCompensate;"; x = 0.27; y = 0.40; w = (6.25 / 40); h = (1 / 25); }; class AdminCompensTex : Life_RscEdit { idc = 9922; text = ""; x = 0.04 + (6.25 / 40) + (1 / 250 / (safezoneW / safezoneH)); y = 0.35; w = (13 / 40); h = (1 / 25); }; };};
</pre>
<p>7. <strong>dialog\MasterHandler.h</strong></p>
<pre class="ipsCode prettyprint">
#include "compensate.hpp"
</pre>
<p>8 . <strong>core\admin\fn_adminMenu.sqf</strong></p>
<pre class="ipsCode prettyprint">
#include <macro.h>
/*
File: fn_adminMenu.sqf
Author: Bryan "Tonic" BoardwineDescription: Opens the admin menu, sorry nothing special in here. Take a look for yourself.*/
if(GETC(life_adminlevel) < 1) exitWith {closeDialog 0;};
private["_display","_list","_side"];
disableSerialization;
waitUntil {!isNull (findDisplay 2900)};
_display = findDisplay 2900;
_list = _display displayCtrl 2902;
if(GETC(life_adminlevel) < 1) exitWith {closeDialog 0;};switch(GETC(life_adminlevel)) do
{
case 1: {ctrlShow [2904,false];ctrlShow [2905,false];ctrlShow [2906,false];ctrlShow [2907,false];ctrlShow [2908,false];ctrlShow [2909,false];ctrlShow [2910,false];ctrlShow [2911,false];};
case 2: {ctrlShow [2905,false];ctrlShow [2906,false];ctrlShow [2907,false];ctrlShow [2908,false];ctrlShow [2909,false];ctrlShow [2910,false];ctrlShow [2911,false];};
case 3: {ctrlShow [2907,false];ctrlShow [2908,false];ctrlShow [2909,false];ctrlShow [2910,false];ctrlShow [2911,false];};
case 4: {[2911,false];};
};//Purge List
lbClear _list;{
_side = switch(side _x) do {case west: {"Cop"}; case civilian : {"Civ"}; case independent : {"Med"}; default {"Unknown"};};
_list lbAdd format["%1 - %2", _x getVariable["realname",name _x],_side];
_list lbSetdata [(lbSize _list)-1,str(_x)];
} foreach playableUnits;
if(GETC(life_adminlevel) < 1) exitWith {closeDialog 0;};
</pre>
<p>9 . <strong>core\admin\fn_adminSpectate.sqf</strong></p>
<pre class="ipsCode prettyprint">
#include <macro.h>
/*
File: fn_adminSpectate.sqf
Author: ColinM9991Description: Spectate the chosen player.*/
if(GETC(life_adminlevel) == 0) exitWith {closeDialog 0;};private["_unit"];
_unit = lbData[2902,lbCurSel (2902)];
_unit = call compile format["%1", _unit];
if(isNil "_unit") exitwith {};
if(isNull _unit) exitWith {};
if(_unit == player) exitWith {hint localize "STR_ANOTF_Error";};[] spawn {
while {dialog} do {
closeDialog 0;
sleep 0.01;
};
};_unit switchCamera "INTERNAL";
hint format["You are now spectating %1 \n\n Press F10 to stop Spectating.",_unit getVariable["realname",name _unit]];
AM_Exit = (findDisplay 46) displayAddEventHandler ["KeyDown","if((_this select 1) == 68) then {(findDisplay 46) displayRemoveEventHandler ['KeyDown',AM_Exit];player switchCamera 'INTERNAL';hint 'You have stopped spectating';};false"];
</pre>
<p>10 . <strong>core\admin\fn_adminTeleport.sqf</strong></p>
<pre class="ipsCode prettyprint">
#include <macro.h>
/*
File: fn_adminTeleport.sqf
Author: ColinM9991
Credits: To original script author(s)
Description:
Teleport to chosen position.
*/
if(GETC(life_adminlevel) == 0) exitWith {closeDialog 0;};[] spawn {
while {dialog} do {
closeDialog 0;
sleep 0.01;
};
};tele={
_pos = [_this select 0, _this select 1, _this select 2];
(vehicle player) setpos [_pos select 0, _pos select 1, 0];
onMapSingleClick "";
openMap [false, false];
hint "You have teleported to your selected position";
};
openMap [true, false];
onMapSingleClick "[_pos select 0, _pos select 1, _pos select 2] call tele";
</pre>
<p>11. <strong>core\admin\fn_adminTpHere.sqf</strong></p>
<pre class="ipsCode prettyprint">
#include <macro.h>
/*
File: fn_adminTpHere.sqf
Author: ColinM9991Description: Teleport selected player to you.*/
if(GETC(life_adminlevel) == 0) exitWith {closeDialog 0;};private["_target"];
_target = lbData[2902,lbCurSel (2902)];
_target = call compile format["%1", _target];
if(isNil "_target") exitwith {};
if(isNull _target) exitWith {};
if(_unit == player) exitWith {hint localize "STR_ANOTF_Error";};_target setPos (getPos player);
hint format["You have teleported %1 to your location",_target getVariable["realname",name _target]];
</pre>
<p>12. <strong>core\admin\fn_adminCompensate.sqf</strong></p>
<pre class="ipsCode prettyprint">
#include <macro.h>
/*
File: fn_adminCompensate.sqf
Author: ColinM9991Description: Figure it out.*/
private["_value","_action"];
if(GETC(life_adminlevel) < 2) exitWith {closeDialog 0; hint localize "STR_ANOTF_ErrorLevel";};
_value = parseNumber(ctrlText 9922);
if(_value < 0) exitWith {};
if(_value > 999999) exitWith {hint localize "STR_ANOTF_Fail"};
//if(!([str(_value)] call life_fnc_isnumeric)) exitWith {hint localize "STR_AIM_notnumeric"};_action = [
format [localize "STR_ANOTF_CompWarn",[_value] call life_fnc_numberText],
localize "STR_Admin_Compensate",
localize "STR_Global_Yes",
localize "STR_Global_No"
] call BIS_fnc_guiMessage;if(_action) then {
life_cash = life_cash + _value;
hint format [localize "STR_ANOTF_Success",[_value] call life_fnc_numberText];
closeDialog 0;
} else {
hint localize "STR_NOTF_ActionCancel";
closeDialog 0;
};</pre>
<p>13. <strong>core\admin\fn_adminDebugCon.sqf</strong></p>
<pre class="ipsCode prettyprint">
#include <macro.h>
/*
File: fn_adminDebugCon.sqf
Author: ColinM9991Description: Opens the Debug Console.*/
if(GETC(life_adminlevel) < 3) exitWith {closeDialog 0; hint "You have no business using this";};createDialog "RscDisplayDebugPublic";
[[0,format["Admin %1 has opened the Debug Console.",profileName]],"life_fnc_broadcast",nil,false] spawn life_fnc_MP;
</pre>
<p>14. <strong>core\admin\fn_adminGodMode.sqf</strong></p>
<pre class="ipsCode prettyprint">
#include <macro.h>
/*
File: fn_adminGodMode.sqf
Author: Tobias 'Xetoxyc' SittenauerDescription: Enables God mode for Admin*/
if(GETC(life_adminlevel) < 3) exitWith {closeDialog 0; hint localize "STR_ANOTF_ErrorLevel";};
[] spawn {
while {dialog} do {
closeDialog 0;
sleep 0.01;
};
};if(life_god) then {
life_god = false;
titleText ["God mode disabled","PLAIN"]; titleFadeOut 2;
player allowDamage true;
} else {
life_god = true;
titleText ["God mode enabled","PLAIN"]; titleFadeOut 2;
player allowDamage false;
};
</pre>
<p>15. <strong>core\admin\fn_adminFreeze.sqf</strong></p>
<pre class="ipsCode prettyprint">
#include <macro.h>
/*
File: fn_adminFreeze.sqf
Author: ColinM9991Description: Freezes selected player*/
if(GETC(life_adminlevel) < 3) exitWith {closeDialog 0; hint localize "STR_ANOTF_ErrorLevel";};private["_unit"];
_unit = lbData[2902,lbCurSel (2902)];
_unit = call compile format["%1", _unit];
if(isNil "_unit") exitWith {};
if(isNull _unit) exitWith {};
if(_unit == player) exitWith {hint localize "STR_ANOTF_Error";};[[player],"life_fnc_freezePlayer",_unit,false] spawn life_fnc_MP;
</pre>
<p>16 . <strong>core\admin\fn_adminMarkers.sqf</strong></p>
<pre class="ipsCode prettyprint">
#include <macro.h>
/*
File: fn_adminMarkers.sqf
Sourced from Lystics Player Markers Loop
/
if(GETC(life_adminlevel) < 3) exitWith {closeDialog 0; hint localize "STR_ANOTF_ErrorLevel";};
life_markers = !life_markers;
if(life_markers) then {
PlayerMarkers = [];
FinishedLoop = false;
hint localize "STR_ANOTF_MEnabled";
while{life_markers} do {
{
if !(_x in allUnits) then {
deleteMarkerLocal str _x;
};
} forEach PlayerMarkers;
PlayerMarkers = [];
{
if(alive _x && isplayer _x) then {
deleteMarkerLocal str _x;
_pSee = createMarkerLocal [str _x,getPos _x];
_pSee setMarkerTypeLocal "mil_triangle";
_pSee setMarkerPosLocal getPos _x;
_pSee setMarkerSizeLocal [1,1];
_pSee setMarkerTextLocal format['%1',_x getVariable["realname",name _x]];
_pSee setMarkerColorLocal ("ColorRed");
PlayerMarkers = PlayerMarkers + [_x];
};
} forEach allUnits;
sleep 0.2;
};
FinishedLoop = true;
} else {
if(isNil "FinishedLoop") exitWith {};
hint localize "STR_ANOTF_MDisabled";
waitUntil{FinishedLoop};
{
deleteMarkerLocal str _x;
} forEach PlayerMarkers;
};
</pre>
<p>17. <strong>core\configuration.sqf</strong></p>
<pre class="ipsCode prettyprint">
life_god = false; //Add this
life_frozen = false; //And this
life_markers = false; //Finally this
</pre>
<p>18 . <strong>Nouveau fichier dans core\civilian est nommé le </strong><strong>fn_freezePlayer.sqf</strong></p>
<pre class="ipsCode prettyprint">
#include <macro.h>
/
File: fn_freezePlayer.sqf
Author: ColinM9991Description: Freezes selected player*/
private["_admin"];
_admin = [_this,0,ObjNull,[ObjNull]] call BIS_fnc_param;if(life_frozen) then {
hint localize "STR_NOTF_Unfrozen";
[[1,format[localize "STR_ANOTF_Unfrozen",profileName]],"life_fnc_broadcast",_admin,false] spawn life_fnc_MP;
disableUserInput false;
life_frozen = false;
} else {
hint localize "STR_NOTF_Frozen";
[[1,format[localize "STR_ANOTF_Frozen",profileName]],"life_fnc_broadcast",_admin,false] spawn life_fnc_MP;
disableUserInput true;
life_frozen = true;
};
</pre>
<p>Voila , aurevoir et au fait je suis de retour </p>
</p>
-
<p>Bonjour à tous, aujourd'hui je vais traduire un tutoriel pour ajouter la bourse, source : altisliferpg.com<br/><br/>
1 - Allez dans votre functions.h et ajouter ceci à la fin :</p>
<pre class="ipsCode prettyprint lang-auto">
class Market{ file = "core\market"; class openMarketView; class refreshMarketView; class marketShortView; class marketBuy; class marketSell; class marketGetBuyPrice; class marketGetSellPrice; class marketconfiguration; class marketReset; class marketChange; class marketGetRow; class marketGetPriceRow; class marketSetPriceRow;};</pre>
<p>Dans le fichier functions.h à nouveau, ajouter ceci en dessous de la class functions :</p>
<pre class="ipsCode prettyprint lang-auto">
class Functions{ file = "core\functions"; class randomRound {}; // <--------- add this};</pre>
<p>2 - Allez dans le dossier Dialog et copier les 2 fichiers disponibles dans le .zip et ouvrer votre MasterHandler.h et ajouter ceci :</p>
<pre class="ipsCode prettyprint lang-auto">
#include "common_EditorWrapper.hpp"#include "market.hpp"</pre>
<p>3 - Ouvrez votre fn_virt_sell.sqf dans core/shops<br/><br/>
Ajoutez à private ceci ["_marketprice"];<br/>
Comme ceci :</p>
<pre class="ipsCode prettyprint lang-auto">
private["_type","_index","_price","_var","_amount","_name","_marketprice"];</pre>
<p>Maintenant trouver cette ligne :</p>
<pre class="ipsCode prettyprint lang-auto">
_price = (GETC(sell_array) select _index) select 1;_var = [_type,0] call life_fnc_varHandle;</pre>
<p>Ajoutez ceci en dessous :</p>
<pre class="ipsCode prettyprint lang-auto">
_marketprice = [_type] call life_fnc_marketGetSellPrice;if(_marketprice != -1) then{ _price = _marketprice;};</pre>
<p>Trouvez cette ligne :</p>
<pre class="ipsCode prettyprint lang-auto">
life_cash = life_cash + _price;</pre>
<p>Ajoutez ceci en dessous :</p>
<pre class="ipsCode prettyprint lang-auto">
if(_marketprice != -1) then { [_type, _amount] spawn { sleep 120; [_this select 0,_this select 1] call life_fnc_marketSell; };};</pre>
<p>4- Fermer le fichier et ouvrer le fichier fn_virt_update.sqf dans le même dossier<br/><br/>
Ajoutez à private ceci ["_marketprice"];<br/>
Comme ceci :</p>
<pre class="ipsCode prettyprint lang-auto">
private["_type","_index","_price","_var","_amount","_name","_marketprice"];</pre>
<p>Maintenant trouvez cette ligne :</p>
<pre class="ipsCode prettyprint lang-auto">
_price = (GETC(buy_array) select _index) select 1;</pre>
<p>Ajoutez ceci en dessous:</p>
<pre class="ipsCode prettyprint lang-auto">
marketprice = [_x] call life_fnc_marketGetBuyPrice;if(_marketprice != -1) then{ _price = _marketprice;};</pre>
<p>A la fin du fichier ajoutez ceci :</p>
<pre class="ipsCode prettyprint lang-auto">
//Call short view here[_shop_data select 1] spawn life_fnc_marketShortView;</pre>
<p>Comme ceci :</p>
<pre class="ipsCode prettyprint lang-auto">
if(_val > 0) then { _gear_list lbAdd format["%1x %2",_val,_name]; _gear_list lbSetData [(lbSize _gear_list)-1,_x]; };} foreach (_shop_data select 1); //Call short view here // this its the new line to add[_shop_data select 1] spawn life_fnc_marketShortView; // this its the new line to add</pre>
<p>5 - Fermer le fichier et ouvrez fn_virt_buy.sqf aussi dans le même dossier<br/><br/>
Ajoutez à private ceci :</p>
<pre class="ipsCode prettyprint lang-auto">
"_marketprice"</pre>
<p>Comme ceci :</p>
<pre class="ipsCode prettyprint lang-auto">
private["_type","_price","_amount","_diff","_name","_hideout","_marketprice"];</pre>
<p>Trouvez cette ligne :</p>
<pre class="ipsCode prettyprint lang-auto">
_amount = ctrlText 2404;</pre>
<p>Ajoutez ceci en dessous:</p>
<pre class="ipsCode prettyprint lang-auto">
_marketprice = [_type] call life_fnc_marketGetBuyPrice;if(_marketprice != -1) then{ _price = _marketprice;};</pre>
<p>Trouvez cette ligne :</p>
<pre class="ipsCode prettyprint lang-auto">
SUB(life_cash,(_price * _amount));</pre>
<p>Ajoutez ceci en dessous:</p>
<pre class="ipsCode prettyprint lang-auto">
if(_marketprice != -1) then { //##94 [_type, _amount] spawn { sleep 120; [_this select 0,_this select 1] call life_fnc_marketBuy; }; };</pre>
<p>6 - Ouvrer le fichier dialog\player_inv.hpp<br/><br/>
En dessous de ceci :</p>
<pre class="ipsCode prettyprint lang-auto">
class ButtonSyncData : life_RscButtonMenu { idc = -1; //shortcuts[] = {0x00050000 + 2}; text = "$STR_PM_SyncData"; onButtonClick = "[] call SOCK_fnc_syncData;"; x = 0.1; y = 0.805; w = (6.25 / 40); h = (1 / 25);};</pre>
<p>Ajoutez ceci :</p>
<pre class="ipsCode prettyprint lang-auto">
class ButtonMarket : Life_RscButtonMenu { idc = -1; text = "Bourse"; onButtonClick = "[] spawn life_fnc_openMarketView;"; //x = 0.26 + (6.25 / 19.8) + (1 / 250 / (safezoneW / safezoneH)); x = 0.26 + (6.25 / 19.8) + (1 / 250 / (safezoneW / safezoneH)); y = 0.805; w = (6.25 / 40); h = (1 / 25);};</pre>
<p>Ouvrez le fichier init.sqf dans VOTRENOMDEMISSION\init.sqf et en dessous de :</p>
<pre class="ipsCode prettyprint lang-auto">
[] execVM "briefing.sqf"; //Load Briefing[] execVM "KRON_Strings.sqf";</pre>
<p>Ajoutez ça :</p>
<pre class="ipsCode prettyprint lang-auto">
if(isDedicated && isNil("life_market_prices")) then{[] call life_fnc_marketconfiguration;diag_log "Market prices generated!"; "life_market_prices" addPublicVariableEventHandler{diag_log format["Market prices updated! %1", _this select 1];}; //Start server fsm[] execFSM "core\fsm\server.fsm";diag_log "Server FSM executed";};</pre>
<p>Et pour la dernière étape allez dans core\fsm and déplacer le fichier server.fsm dispo dans le .zip<br/><br/>
Désormais vous avez votre système de bourse, enjoy <br/><br/>
Pour le kick par BattlEye, il suffit d'ajouter ces lignes dans Battleye\publicvariable.txt :</p>
<pre class="ipsCode prettyprint lang-auto">
1 "" !="life_HC_isActive" !="HC_UID"7 "" !="life_market_shortnames" !="life_fnc_MP_packet" !="BIS_fnc_MP_packet" !="JipTimeNow" !="life_HC_isActive" !="HC_UID" !="life_gang_list" !="bank_addfunds" !="life_market_prices" !="IL_SetMass" !="IL_SetScore" !="IL_SetDir" !="life_market_resources" !="bis_fnc_execvm" !="Life_fnc_execvm"</pre>
<p>Maintenant pour la version 3.1.4.6+ changez le fichier fn_virt_sell.sqf danscore/shops remplacez le par ceci :</p>
<pre class="ipsCode prettyprint lang-auto">
#include <macro.h>/* File: fn_virt_sell.sqf Author: Bryan "Tonic" Boardwine Description: Sell a virtual item to the store / shop*/ private["_type","_index","_price","_var","_amount","_name","_marketprice"];if((lbCurSel 2402) == -1) exitWith {};_type = lbData[2402,(lbCurSel 2402)];_index = [_type,GETC(sell_array)] call fnc_index;if(_index == -1) exitWith {};_price = (GETC(sell_array) select _index) select 1;_var = [_type,0] call life_fnc_varHandle;_marketprice = [_type] call life_fnc_marketGetSellPrice;if(_marketprice != -1) then{ _price = _marketprice;}; _amount = ctrlText 2405;if(!([_amount] call fnc_isnumber)) exitWith {hint localize "STR_Shop_Virt_NoNum";};_amount = parseNumber (_amount);if(_amount > (missionNameSpace getVariable _var)) exitWith {hint localize "STR_Shop_Virt_NotEnough"}; _price = (_price * _amount);_name = [_var] call life_fnc_vartostr;if(([false,_type,_amount] call life_fnc_handleInv)) then{ hint format[localize "STR_Shop_Virt_SellItem",_amount,_name,[_price] call life_fnc_numberText]; life_cash = life_cash + _price; if(_marketprice != -1) then { [_type, _amount] spawn { sleep 120; [_this select 0,_this select 1] call life_fnc_marketSell; }; }; [] call life_fnc_virt_update; }; if(life_shop_type == "heroin") then{ private["_array","_ind","_val"]; _array = life_shop_npc getVariable["sellers",[]]; _ind = [getPlayerUID player,_array] call fnc_index; if(_ind != -1) then { _val = (_array select _ind) select 2; _val = _val + _price; _array set[_ind,[getPlayerUID player,profileName,_val]]; life_shop_npc setVariable["sellers",_array,true]; } else { _array set[count _array,[getPlayerUID player,profileName,_price]]; life_shop_npc setVariable["sellers",_array,true]; };};</pre>
<p>Merci à : Linxy pour son aide<br/><br/>
Touts les fichiers nécessaire (.zip) : <a href="https://mega.co.nz/#!fZFQjJbB!OGIlZTYFW-ZT-czIiOE8k6GPBFa056TcJTR8u9T6jS8" rel="external nofollow">https://mega.co.nz/#!fZFQjJbB!OGIlZTYFW-ZT-czIiOE8k6GPBFa056TcJTR8u9T6jS8</a><br/><br/><br/>
Patch 3.1.4.8: Copiez les fichiers suivant spécifiques :<br/><br/>
fn.Virt_sell.sqf</p>
<pre class="ipsCode prettyprint lang-auto">
#include <macro.h>/* File: fn_virt_sell.sqf Author: Bryan "Tonic" Boardwine Description: Sell a virtual item to the store / shop*/private["_type","_index","_price","_var","_amount","_name","_marketprice"];if((lbCurSel 2402) == -1) exitWith {};_type = lbData[2402,(lbCurSel 2402)];_index = [_type,GETC(sell_array)] call TON_fnc_index;if(_index == -1) exitWith {};_price = (GETC(sell_array) select _index) select 1;_var = [_type,0] call life_fnc_varHandle;////Marktsystem Anfang////_marketprice = [_type] call life_fnc_marketGetSellPrice;if(_marketprice != -1) then{ _price = _marketprice;};////Marktsystem Ende//// _amount = ctrlText 2405;if(!([_amount] call fnc_isnumber)) exitWith {hint "You didn't enter an actual number";};_amount = parseNumber (_amount);if(_amount > (missionNameSpace getVariable _var)) exitWith {hint "You don't have that many items to sell!"}; _price = (_price * _amount);_name = [_var] call life_fnc_vartostr;if(([false,_type,_amount] call life_fnc_handleInv)) then{ hint format["You sold %1 %2 for $%3",_amount,_name,[_price] call life_fnc_numberText]; life_cash = life_cash + _price; ////Marktsystem Anfang//// if(_marketprice != -1) then { [_type, _amount] spawn { sleep 120; [_this select 0,_this select 1] call life_fnc_marketSell; }; ////Marktsystem Ende//// }; [] call life_fnc_virt_update; }; if(life_shop_type == "heroin") then{ private["_array","_ind","_val"]; _array = life_shop_npc getVariable["sellers",[]]; _ind = [getPlayerUID player,_array] call TON_fnc_index; if(_ind != -1) then { _val = (_array select _ind) select 2; _val = _val + _price; _array set[_ind,[getPlayerUID player,profileName,_val]]; life_shop_npc setVariable["sellers",_array,true]; } else { _array pushBack _array,[getPlayerUID player,profileName,_price]]; life_shop_npc setVariable["sellers",_array,true]; };};</pre>
<p>fn.virt_update.sqf</p>
<pre class="ipsCode prettyprint lang-auto">
#include <macro.h>/* File: fn_virt_update.sqf Author: Bryan "Tonic" Boardwine Description: Update and fill the virtual shop menu.*/private["_display","_item_list","_gear_list","_shop_data","_name","_price","_marketprice"];disableSerialization; //Setup control vars._display = findDisplay 2400;_item_list = _display displayCtrl 2401;_gear_list = _display displayCtrl 2402; //Purge listlbClear _item_list;lbClear _gear_list; _shop_data = [life_shop_type] call life_fnc_virt_shops;ctrlSetText[2403,format["%1", _shop_data select 0]]; { _name = [([_x,0] call life_fnc_varHandle)] call life_fnc_vartostr; _index = [_x,GETC(buy_array)] call TON_fnc_index; if(_index != -1) then { _price = (GETC(buy_array) select _index) select 1; ////Marktsystem Anfang//// _marketprice = [_x] call life_fnc_marketGetBuyPrice; if(_marketprice != -1) then { _price = _marketprice; }; ////Marktsystem Ende//// _item_list lbAdd format["%1 ($%2)",_name,[_price] call life_fnc_numberText]; _item_list lbSetData [(lbSize _item_list)-1,_x]; _item_list lbSetValue [(lbSize _item_list)-1,_price]; };} foreach (_shop_data select 1); { _var = [_x,0] call life_fnc_varHandle; _val = missionNameSpace getVariable _var; _name = [_var] call life_fnc_vartostr; if(_val > 0) then { _gear_list lbAdd format["%1x %2",_val,_name]; _gear_list lbSetData [(lbSize _gear_list)-1,_x]; };} foreach (_shop_data select 1); //Call short view here[_shop_data select 1] spawn life_fnc_marketShortView;</pre>
<p>And a little exemple for fix the xxxxxx in the market:</p>
<pre class="ipsCode prettyprint lang-auto">
["apple", 100, 50, 150, 4, 2, [ ["peach",1] <------- no coma ] ], and for long line["cement", 2250, 250, 4250, 4, 2, [ ["diamondc",1], <------- coma ["oilp",1], <------- coma ["iron_r",1], <------- coma ["copper_r",1], <------- coma ["salt_r",1], <------- coma ["glass",1] <------- no coma ] ], Last items in your configurationmarket ["heroinp", 7000, 3000, 10000, 4, 4, [ ["marijuana",1], <------- coma ["turtle",1], <------- coma ["cocainep",1] <------- no coma ] ] <------- no coma</pre>
<p>Crédit : _Fuzz pour le tutoriel sur altisliferpg.com et EdgeKiller pour la traduction !</p>
-
<p><span style="font-size:14px;"><span style="font-family:'trebuchet ms', helvetica, sans-serif;">Bonjour à toutes et à tous !</span></span></p>
<p> </p>
<p><span style="font-size:14px;"><span style="font-family:'trebuchet ms', helvetica, sans-serif;">Aujourd'hui je vais vous expliquer comment créer un serveur privé S4League simplement, et rapidement ! (Avant d'aller plus loin dans les tutoriels bien entendu)</span></span></p>
<p> </p>
<p>/!\ CE TUTORIEL A ÉTÉ RÉDIGÉ POUR MELINYEL /!</p>
<p> </p>
<p><span style="font-family:'trebuchet ms', helvetica, sans-serif;"><span style="color:#ff8c00;"><u><span style="font-size:36px;">Pré-requis :</span></u></span></span></p>
<p> </p>
<p><span style="font-size:14px;"><span style="font-family:'trebuchet ms', helvetica, sans-serif;">- L'émulateur : </span></span><a href="https://mega.co.nz/#!dJRj2BQS!aDD055yhVXuGc4QDZlrCpdjfYibBgtJx90su72gM0c8" rel="external nofollow">https://mega.co.nz/#!dJRj2BQS!aDD055yhVXuGc4QDZlrCpdjfYibBgtJx90su72gM0c8</a></p>
<p><span style="font-size:14px;"><span style="font-family:'trebuchet ms', helvetica, sans-serif;">- Le client (Mis à jour à la version de l'ému) : <a href="https://mega.co.nz/#!9ZIFmYrA!xXeD2Cul5uUJUXi2cHMLYhsNnmHMGH1EhxlCPHRCuTo" rel="external nofollow">https://mega.co.nz/#!9ZIFmYrA!xXeD2Cul5uUJUXi2cHMLYhsNnmHMGH1EhxlCPHRCuTo</a></span></span></p>
<p>- Les sources (si vous souhaitez améliorer l'émulateur, & autre) : <a href="https://mega.co.nz/#!ZJwWGLYI!2xc0W_MZpb1GinX6APmsiLs9tnEbu6kVyU2SLy14Z6Y" rel="external nofollow">https://mega.co.nz/#!ZJwWGLYI!2xc0W_MZpb1GinX6APmsiLs9tnEbu6kVyU2SLy14Z6Y</a></p>
<p><span style="font-size:14px;"><span style="font-family:'trebuchet ms', helvetica, sans-serif;">- Navicat : </span></span><a href="http://navicat.softonic.fr/" rel="external nofollow">http://navicat.softonic.fr/</a></p>
<p><span style="font-size:14px;"><span style="font-family:'trebuchet ms', helvetica, sans-serif;">- uWamp (pour les bases de données) : <a href="http://www.uwamp.com/fr/?page=download" rel="external nofollow">http://www.uwamp.com/fr/?page=download</a></span></span></p>
<p> </p>
<p><span style="color:#ff8c00;"><u><span style="font-size:36px;"><span style="font-family:'trebuchet ms', helvetica, sans-serif;">Etape 1 - Installation des bases de données :</span></span></u></span></p>
<p> </p>
<p><span style="font-size:14px;"><span style="font-family:'trebuchet ms', helvetica, sans-serif;">Commencez par ouvrir le dossier de l'émulateur, vous devriez avoir ceci :</span></span></p>
<p> </p>
<p><img alt="1414682567-415a3537ae2.png" src="<base_url>/applications/sslimageproxy/interface/image.php?url=http://image.noelshack.com/fichiers/2014/44/1414682567-415a3537ae2.png"/></p>
<p><span style="font-size:14px;"><span style="font-family:'trebuchet ms', helvetica, sans-serif;">Ouvrez par la suite le dossier "sql" qui contient les 2 sql des 2 bases de données du serveur :</span></span></p>
<p> </p>
<p><img alt="1414682650-a31259c54c2.png" src="<base_url>/applications/sslimageproxy/interface/image.php?url=http://image.noelshack.com/fichiers/2014/44/1414682650-a31259c54c2.png"/></p>
<p> </p>
<p>Installez uWamp, lancez le, et connecter vous grâce à Navicat avec les identifiants suivants :</p>
<p>- utilisateur : root</p>
<p>- mot de passe : root</p>
<p>- port : 3306</p>
<p>- host : 127.0.0.1</p>
<p> </p>
<p><span style="font-size:14px;"><span style="font-family:'trebuchet ms', helvetica, sans-serif;">Créez 2 bases de données du même nom que ces deux sql, vu un peu plus haut :</span></span></p>
<p> </p>
<p><img alt="d6a1758630.png" src="https://puu.sh/cwlmj/d6a1758630.png"/> <img alt="1d5fd4b8ee.png" src="https://puu.sh/cwlnE/1d5fd4b8ee.png"/></p>
<p> </p>
<p><span style="font-size:14px;"><span style="font-family:'trebuchet ms', helvetica, sans-serif;">Une fois ces deux bases de données crées, exécutez les sql correspondant dedans :</span></span></p>
<p> </p>
<p><img alt="1414682895-929a54d3ec2.png" src="<base_url>/applications/sslimageproxy/interface/image.php?url=http://image.noelshack.com/fichiers/2014/44/1414682895-929a54d3ec2.png"/> <img alt="1414682895-c49fd5f3a92.png" src="<base_url>/applications/sslimageproxy/interface/image.php?url=http://image.noelshack.com/fichiers/2014/44/1414682895-c49fd5f3a92.png"/></p>
<p> </p>
<p><span style="font-size:14px;"><span style="font-family:'trebuchet ms', helvetica, sans-serif;">Maintenant, rendez vous dans la table "server" de la base de donnée "auth" :</span></span></p>
<p> </p>
<p><img alt="1414683035-fa9e28faf52.png" src="<base_url>/applications/sslimageproxy/interface/image.php?url=http://image.noelshack.com/fichiers/2014/44/1414683035-fa9e28faf52.png"/></p>
<p> </p>
<p><span style="font-size:14px;"><span style="font-family:'trebuchet ms', helvetica, sans-serif;">Voici ce que vous pouvez modifier :</span></span></p>
<p> </p>
<p><span style="font-size:14px;"><span style="font-family:'trebuchet ms', helvetica, sans-serif;">- le nom du serveur sur la première ligne "FagNet" en ce que vous voulez, "Serveur 1" etc .. </span></span></p>
<p><span style="font-size:14px;"><span style="font-family:'trebuchet ms', helvetica, sans-serif;"><span style="color:#ff0000;"><strong>ATTENTION : VOUS NE DEVEZ PAS TOUCHER LE NOM DES AUTRES "FAGNET" !</strong></span></span></span></p>
<p> </p>
<p><span style="font-size:14px;"><span style="font-family:'trebuchet ms', helvetica, sans-serif;">- La limite de joueur, ici fixée à 1000.</span></span></p>
<p> </p>
<p><span style="font-size:14px;"><span style="font-family:'trebuchet ms', helvetica, sans-serif;">- L'IP à modifier en conséquence (votre IP hamachi, ou l'ip de la machine, à changer dans les 4 cases.)</span></span></p>
<p><span style="font-size:14px;"><span style="font-family:'trebuchet ms', helvetica, sans-serif;"><span style="color:#ff0000;"><strong>ATTENTION : VOUS NE DEVEZ PAS TOUCHER AUX PORTS !</strong></span></span></span></p>
<p> </p>
<p><span style="font-size:14px;"><span style="font-family:'trebuchet ms', helvetica, sans-serif;">Et voilà ! La base de donnée est prête ! passons à la suite !</span></span></p>
<p> </p>
<p><span style="color:#ff8c00;"><span style="font-size:36px;"><u>Etape 2 - Configuration du serveur et lancement !</u></span></span></p>
<p> </p>
<p><span style="font-size:14px;"><span style="font-family:'trebuchet ms', helvetica, sans-serif;">On va retourner dans le dossier du serveur configurer les fichiers suivants :</span></span></p>
<p><span style="font-size:14px;"><span style="font-family:'trebuchet ms', helvetica, sans-serif;">- auth_config.xml</span></span></p>
<p><span style="font-size:14px;"><span style="font-family:'trebuchet ms', helvetica, sans-serif;">- chat_config.xml</span></span></p>
<p><span style="font-size:14px;"><span style="font-family:'trebuchet ms', helvetica, sans-serif;">- game_config.xml</span></span></p>
<p><span style="font-size:14px;"><span style="font-family:'trebuchet ms', helvetica, sans-serif;">- relay_config.xml</span></span></p>
<p> </p>
<p><img alt="1414682567-415a3537ae2.png" src="<base_url>/applications/sslimageproxy/interface/image.php?url=http://image.noelshack.com/fichiers/2014/44/1414682567-415a3537ae2.png"/></p>
<p><span style="font-family:'trebuchet ms', helvetica, sans-serif;"><span style="font-size:14px;">Voici comment ils doivent être configurés (le texte affiché en noir est là pour vous aider, il n’apparaît pas normalement) : </span></span></p>
<p> </p>
<p><em><strong>Auth_config.xml :</strong></em></p>
<p> </p>
<p><img alt="1414683510-2150ce06942.png" src="<base_url>/applications/sslimageproxy/interface/image.php?url=http://image.noelshack.com/fichiers/2014/44/1414683510-2150ce06942.png"/></p>
<p> </p>
<p><em><strong>Chat_config.xml :</strong></em></p>
<p> </p>
<p><img alt="1414683593-61fa4e8d322.png" src="<base_url>/applications/sslimageproxy/interface/image.php?url=http://image.noelshack.com/fichiers/2014/44/1414683593-61fa4e8d322.png"/></p>
<p> </p>
<p><em><strong>Game_config.xml :</strong></em></p>
<p> </p>
<p><img alt="1414683887-7a28f4f7212.png" src="<base_url>/applications/sslimageproxy/interface/image.php?url=http://image.noelshack.com/fichiers/2014/44/1414683887-7a28f4f7212.png"/></p>
<p> </p>
<p><em><strong>Relay_config.xml :</strong></em></p>
<p> </p>
<p><em><strong><img alt="1414683887-7926a7c64f2.png" src="<base_url>/applications/sslimageproxy/interface/image.php?url=http://image.noelshack.com/fichiers/2014/44/1414683887-7926a7c64f2.png"/></strong></em></p>
<p> </p>
<p><span style="font-family:'trebuchet ms', helvetica, sans-serif;"><span style="font-size:14px;">Voilà pour ça ! vous n'avez plus qu'à démarrer toutes les applications dans l'ordre ainsi défini : </span></span></p>
<p> </p>
<p><span style="font-family:'trebuchet ms', helvetica, sans-serif;"><span style="font-size:14px;">- FagNetAuth.exe </span></span></p>
<p><span style="font-family:'trebuchet ms', helvetica, sans-serif;"><span style="font-size:14px;">- FagNetChat.exe</span></span></p>
<p><span style="font-family:'trebuchet ms', helvetica, sans-serif;"><span style="font-size:14px;">- FagNetGame.exe</span></span></p>
<p><span style="font-family:'trebuchet ms', helvetica, sans-serif;"><span style="font-size:14px;">- FagNetRelay.exe</span></span></p>
<p></p><p><span style="font-family:'trebuchet ms', helvetica, sans-serif;"><span style="font-size:14px;">Votre serveur est désormais ouvert et fonctionnel ! </span></span></p>
<p> </p>
<p><span style="color:#ff8c00;"><u><span style="font-size:36px;"><span style="font-family:'trebuchet ms', helvetica, sans-serif;">Etape 3 - Réglage du client : </span></span></u></span></p>
<p> </p>
<p><span style="font-size:14px;"><span style="font-family:'trebuchet ms', helvetica, sans-serif;">Dans le dossier du client, vous aurez un fichier de configuration du nom de : version.ini (ouvrez le et configurez le ainsi) :</span></span></p>
<pre class="ipsCode prettyprint">
[VERSION]
LatestVersion = 1011
MinimalVersion= 1000
OwnVersion = 1[DOWNLOAD]
server1 = http://s4league.patch.aeriagames.com/release/S4L/[SERVER]
INDEX1 = 1
URL1 = http://s4league.patch.aeriagames.com/release/S4L/version.ini
COUNT = 1
IP1 = IP du serveur ici
PORT1 = 28002
</pre>
<p><span style="font-size:14px;"><span style="font-family:'trebuchet ms', helvetica, sans-serif;">Ensuite, lancez le .bat déjà présent dans le dossier afin de lancer le client avec les paramètres de commandes nécessaire </span></span></p>
<p><span style="font-size:14px;"><span style="font-family:'trebuchet ms', helvetica, sans-serif;">Voilà ! C'est fini ! </span></span></p>
<p> </p>
<p><span style="font-family:'trebuchet ms', helvetica, sans-serif;"><span style="font-size:14px;">Je reste à disposition pour toutes les demandes d'aides, au cas ou. </span></span></p>
<p> </p>
<p><span style="font-family:'trebuchet ms', helvetica, sans-serif;"><span style="font-size:14px;">Cordialement,</span></span></p>
<p><span style="font-family:'trebuchet ms', helvetica, sans-serif;"><span style="font-size:14px;">Mihawk.</span></span></p>
-
<p style="text-align: center;"><strong><span style="font-size:24px;"><span style="font-family: lucida sans unicode,lucida grande,sans-serif;">Connexion à 2 facteurs en SSH</span></span></strong></p><p> </p><p><span style="font-family:lucida sans unicode,lucida grande,sans-serif;">Dans un soucis de sécurité permanent, l'authentification à 2 facteurs vient <strong>renforcer la sécurité de votre machine </strong>en ajoutant, en plus de votre mot de passe, un <strong>code sur 6 chiffres généré toutes les 30 secondes</strong>. Ainsi, un pirate ayant eu connaissance de votre mot de passe ne pourra se connecter que s'il connait le code de sécurité.</span></p><p> </p><p><span style="font-family:lucida sans unicode,lucida grande,sans-serif;"><span style="font-size:18px;"><strong>Installation et configuration sur la machine :</strong></span></span></p><p><span style="font-family:lucida sans unicode,lucida grande,sans-serif;"><hr/></span></p><p><span style="font-family:lucida sans unicode,lucida grande,sans-serif;">Tout d'abord installer le paquet</span><span style="font-family:courier new,courier,monospace;"> <strong>libpam-google-authenticator</strong></span><span style="font-family:lucida sans unicode,lucida grande,sans-serif;"> :</span></p><pre class="html ipsCode prettyprint" data-pbcklang="html" data-pbcktabsize="4">sudo apt-get install libpam-google-authenticator</pre><p> </p><p><span style="font-family:lucida sans unicode,lucida grande,sans-serif;">Ensuite vous devez <strong>générer une clé d'authentification</strong> qui servira pour l'application qui générera le code secret :</span></p><pre class="html ipsCode prettyprint" data-pbcklang="html" data-pbcktabsize="4">google-authenticator</pre><p> </p><p><span style="font-family:lucida sans unicode,lucida grande,sans-serif;"><strong>Suivez les instructions et sauvegardez dans un coin les clés de secours</strong> (car si vous n'avez plus accès à votre application, il vous sera alors impossible de vous connecter à votre serveur).</span></p><p> </p><p><span style="font-family:lucida sans unicode,lucida grande,sans-serif;">Ajoutez la ligne suivante au fichier <strong>/etc/pam.d/sshd</strong> :</span></p><pre class="html ipsCode prettyprint" data-pbcklang="html" data-pbcktabsize="4">auth required pam_google_authenticator.so</pre><p> </p><p><span style="font-family:lucida sans unicode,lucida grande,sans-serif;">Cherchez l'attribut suivant <strong>/etc/ssh/sshd_config </strong>dans le fichier et modifiez sa valeur comme ci-dessous :</span></p><pre class="html ipsCode prettyprint" data-pbcklang="html" data-pbcktabsize="4">ChallengeResponseAuthentication yes</pre><p> </p><p><span style="font-family:lucida sans unicode,lucida grande,sans-serif;">Redémarrez le service <strong>ssh </strong>:</span></p><pre class="html ipsCode prettyprint" data-pbcklang="html" data-pbcktabsize="4">sudo service ssh restart</pre><p> </p><p><span style="font-family:lucida sans unicode,lucida grande,sans-serif;">Votre machine est prête, il ne vous reste plus qu'à configurer votre application.</span></p><p> </p><p><span style="font-family:lucida sans unicode,lucida grande,sans-serif;"><span style="font-size:18px;"><strong>Sur votre application OTP :</strong></span></span></p><p><span style="font-family:lucida sans unicode,lucida grande,sans-serif;"><hr/></span></p><p><span style="font-family:lucida sans unicode,lucida grande,sans-serif;">Ajoutez une nouvelle clé avec la configuration qui suit :</span></p><ul><li><span style="font-family:lucida sans unicode,lucida grande,sans-serif;"><strong>Secret :</strong> la clé secrète générée avec le terminal</span></li><li><span style="font-family:lucida sans unicode,lucida grande,sans-serif;"><strong>Type :</strong> TOTP</span></li><li><span style="font-family:lucida sans unicode,lucida grande,sans-serif;"><strong>Digits :</strong> 6</span></li><li><span style="font-family:lucida sans unicode,lucida grande,sans-serif;"><strong>Algorithm : </strong>SHA512</span></li><li><span style="font-family:lucida sans unicode,lucida grande,sans-serif;"><strong>Interval : </strong>30</span></li></ul>
-
<p>Bonjour à tous</p><p>Pour s'améliorer en SQL selon moi la meilleure façon c'est de pratiquer et faire des erreurs (bien se prendre la tête
). Du coup, je vous met à disposition ce petit travail personnel (niveau BTS, SIO) à disposition.</p><p>L’énoncé (avec la BDD, affichée) + Le fichier texte pour ouvrir la BDD + La correction si join.</p><p> </p><p>Si ça intéresse je peux mettre d'autres TPs.</p><p>Et si vous avez des questions n'hésitez pas !</p><p>Akimace.</p><p></p><p><a class="attach-link" href="<base_url>/applications/core/interface/file/attachment.php?id=274">TP01 - Vol Aérien.pdf</a></p><p><a class="attach-link" href="<base_url>/applications/core/interface/file/attachment.php?id=275">BDD.txt</a></p>
<p><a class="attach-link" href="https://melinyel.net/applications/core/interface/file/attachment.php?id=279">Correction.docx</a></p>
-
<p style="text-align: center;"><span style="font-family:lucida sans unicode,lucida grande,sans-serif;"><span style="font-size: 24px;"><strong>Recherche par dichotomie</strong></span></span></p><p> </p><p><span style="font-family:lucida sans unicode,lucida grande,sans-serif;">La recherche dichotomique est un moyen efficace de trouve l'indice d'un nombre dans un <strong>tableau trié</strong>. Par rapport à une recherche classique, vous ferez moins de lecture dans votre tableau.</span></p><p> </p><p><span style="font-family:lucida sans unicode,lucida grande,sans-serif;"><span style="font-size: 18px;"><strong>Principe :</strong></span></span></p><hr/><p><span style="font-family:lucida sans unicode,lucida grande,sans-serif;">C'est très simple !</span></p><p><span style="font-family:lucida sans unicode,lucida grande,sans-serif;">Prenons le tableau contenant 10 éléments : <strong>1 | 4 | 7 | 8 | 10 | 15 | 18 | 19 | 32 | 35</strong></span></p><p><span style="font-family:lucida sans unicode,lucida grande,sans-serif;"><strong>Celui-ci est trié de manière croissante et il faut qu'il le soit impérativement !</strong></span></p><p> </p><p><span style="font-family:lucida sans unicode,lucida grande,sans-serif;"><strong>Théorie :</strong></span></p><p><span style="font-family:lucida sans unicode,lucida grande,sans-serif;">Comme dans une recherche simple, vous allez devoir faire une boucle. Mais cette fois <strong>vous commencerez au milieu du tableau</strong> (donc ici à l'indice n°5).</span></p><p><span style="font-family:lucida sans unicode,lucida grande,sans-serif;">Si votre <strong>nombre est inférieur </strong>au nombre de l'indice du milieu (tab[5]), alors<strong> vous vous concentrerez que sur la partie inférieure</strong> (gauche) de votre tableau.</span></p><p><span style="font-family:lucida sans unicode,lucida grande,sans-serif;">Si votre <strong>nombre est supérieur</strong> au nombre de l'indice du milieu (tab[5]), alors<strong> vous vous concentrerez que sur la partie supérieure</strong> (droite) de votre tableau.</span></p><p><span style="font-family:lucida sans unicode,lucida grande,sans-serif;">Vous recommencerez jusqu'à trouver l'indice du nombre.</span></p><p> </p><p><span style="font-family:lucida sans unicode,lucida grande,sans-serif;"><strong>Exemple :</strong> Je cherche l'indice du nombre 8.</span></p><ol><li><span style="font-family:lucida sans unicode,lucida grande,sans-serif;">Je me place à la moitié de mon tableau (indiceMilieu = 5) et je regarde si mon nombre est plus grand, plus petit ou égal. Il est plus petit donc je me concentre sur les nombres d'indices compris entre 0 et 5.</span></li><li><span style="font-family:lucida sans unicode,lucida grande,sans-serif;">Je me place à la moitié ( (0 + 5) / 2 = 2). tab[2] < 8 donc je concentre sur les nombres d'indices compris entre 2 et 5.</span></li><li><span style="font-family:lucida sans unicode,lucida grande,sans-serif;">Je me place à la moitié ( (2 + 5) / 2 = 3) . tab[3] = 8 donc je peux arrêter et retourner l'indice correspondant.</span></li></ol><p><span style="font-family:lucida sans unicode,lucida grande,sans-serif;">En conclusion, je n'ai que 3 itérations avec la recherche dichotomique. Avec une rechercher classique, j'aurais eu 4 itérations. </span></p><p><span style="font-family:lucida sans unicode,lucida grande,sans-serif;">Ceci est peut-être insignifiant dans ce cas mais sur des grands tableaux, la recherche dichotomique est très utile.</span></p><p> </p><p><span style="font-family:lucida sans unicode,lucida grande,sans-serif;"><span style="font-size: 18px;"><strong>Implémentation en Java :</strong></span></span></p><hr/><p><span style="font-family:lucida sans unicode,lucida grande,sans-serif;">Petit cadeau, je vous offre la fonction java qui permet de faire une recherche par dichotomie mais je vous conseil de la coder vous même car elle n'est pas très dure et c'est toujours instructif de faire les chose sois-même
</span></p><p> </p><blockquote class="ipsStyle_spoiler" data-ipsspoiler="" tabindex="0"><pre class="html ipsCode prettyprint" data-pbcklang="html" data-pbcktabsize="4">public static int rechercherDichotomie(int[] tab, int nb)
{
int indMin, indMax, indMid;// Si votre tableau n'est pas trié, triez le avant ! // On prend l'ensemble du tableau au départ indMin = 0; indMax = tab.length; while ((indMax - indMin) > 1) { // On prend le milieu entre indMin et indMax indMid = ((indMin + indMax) / 2); // On détermine si le nombre est supérieur, inférieur ou égal à tab[indMid] if (nb > this.tab[indMid]) { indMin = indMid; } else if (nb < this.tab[indMid]) { indMax = indMid; } else { return indMid; } } // Retourne -1 si l'indice n'a pas été trouvé return -1;}</pre><p> </p></blockquote><p> </p>
-
-
<p>Bonsoir,</p><p>Cela fait un moment que je tente d'extraire les données de S4 League avec le FNRessourceTool.</p><p>Le problème étant qu'à chaque fois que j'essaye, il me met le message : "File format has changed".</p><p>Image : <a href="http://hpics.li/4886ec9" rel="external nofollow">http://hpics.li/4886ec9</a></p><p>Que faire pour y remédier ?</p>
-
<p><span style="font-family:'trebuchet ms', helvetica, sans-serif;">Bonjour / Bonsoir à toutes et à tous !</span></p>
<p> </p>
<p><span style="font-family:'trebuchet ms', helvetica, sans-serif;">Voilà, je vous partage quelques ressources, afin de vous aider dans cette grande aventure ! </span></p>
<p> </p>
<p><span style="font-family:'trebuchet ms', helvetica, sans-serif;"><span style="font-size:24px;"><span style="color:#ff8c00;"><em><strong>Que contient ce partage ?</strong></em></span></span></span></p>
<p> </p>
<p><span style="font-family:'trebuchet ms', helvetica, sans-serif;">- Un outil pour extraire les ressources du jeu, appelé "Ressource Tool" (INDISPENSABLE)</span></p>
<p><span style="font-family:'trebuchet ms', helvetica, sans-serif;">- Un "CMS" d'inscription, afin de faciliter la création de compte pour vos débuts </span></p>
<p> </p>
<p><span style="font-family:'trebuchet ms', helvetica, sans-serif;">(je précise que je ne suis le créateur de rien, si ce n'est le petit tutoriel d'installation pour débutant pour le site, qui figure dans le partage, on sait jamais ça peut toujours servir à certains ^^) </span></p>
<p> </p>
<p><span style="color:#ff8c00;"><span style="font-size:24px;"><em><strong>Comment les télécharger ?</strong></em></span></span></p>
<p> </p>
<p><span style="font-family:'comic sans ms', cursive;">Vous pouvez télécharger ces ressources, sur le site MEGA :</span></p>
<p> </p>
<p><span style="font-family:'comic sans ms', cursive;">==> </span><a href="https://mega.co.nz/#!5Qhz3KgA!A2LmvuC6uIS-9fTZZKpraeYYExYKeGAoPBx_BE-7Ork" rel="external nofollow">https://mega.co.nz/#!5Qhz3KgA!A2LmvuC6uIS-9fTZZKpraeYYExYKeGAoPBx_BE-7Ork</a><span style="font-family:'comic sans ms', cursive;"> <==</span></p>
<p> </p>
<p><span style="font-family:'comic sans ms', cursive;">Voilà ! par la suite, on se servira du "Ressource Tool" pour d'autres tutoriels ! alors n'hésitez surtout pas à le prendre, c'est essentiel pour le développement d'un serveur. </span></p>
<p></p><p><span style="font-family:'comic sans ms', cursive;">Cordialement,</span></p>
<p><span style="font-family:'comic sans ms', cursive;">Mihawk.</span></p>
-
<p>Bonjour</p><p> </p><p>Nous allons voir comment utiliser sa kinect 360 sur son ordinateur pour se scanner en 3D. Kinect est à ce jour sans doute le scanner 3D le moins cher et la qualité est correcte. Plutôt que de laisser votre caméra prendre la poussière à coté de votre Xbox 360, nous allons voir comment l'utiliser comme scanner 3D sur ordinateur.</p><p> </p><p>Dans ce tutoriel :</p><ul><li>Nous utiliserons le logiciel skanect 1.6 (Version free) pour une raison que je vous expliquerai par la suite, mais sachez qu'il existe énormément de logiciel pour se scanner. </li><li>Nous utiliserons une kinect 360 mais d'autres produits comme l'Asus Xtion sont utilisable avec les logiciels adaptés.</li></ul><p style="text-align:center;"><strong><span style="font-size:18px;">1) Installer la kinect 360 sur son ordinateur</span></strong></p> <p> </p><p>Il y a deux installations possibles pour faire fonction la kinect. Nous verrons la plus simple qui est avec les logiciels Microsoft.</p><ul><li>Télécharger <a href="http://www.microsoft.com/en-us/download/details.aspx?id=34808" rel="external nofollow">Kinect SDK 1.6</a></li></ul>Une fois le logiciel installé, branchez votre kinect et laissez Windows uptade installer les pilotes kinect.<p>Les pilotes vous serviront pour toute autre utilisation de votre kinect sur l'ordinateur, (comme une webcam par exemple que nous verrons dans un autre tuto) </p><p></p><p style="text-align:center;"><strong><span style="font-size:18px;">2) Installer Skanect 1.6</span></strong></p> <p> </p><p>Après avoir testé plusieurs logicielles en version free ou même premium pour certain, j'en ai déduit que Skanect 1.6 est le plus efficace à ce jour.</p><p><em>Petit plus : Un des deux développeurs du logiciel est français. Je pense m'acheter une licence premium vers Août/Septembre. </em></p><ul><li>Télécharger<a href="http://skanect.occipital.com/download/" rel="external nofollow"> la version Free de Skanect 1.6</a></li></ul><p style="text-align:center;"></p><p></p><p style="text-align:center;"></p><p></p><p style="text-align:center;"><strong><span style="font-size:18px;">3) Rendu 3D avec Skanect 1.6</span></strong></p><p style="text-align:center;"></p><p></p><p style="text-align:center;"></p><p></p><p style="text-align:center;">
</p><div class="ipsEmbeddedVideo" contenteditable="false"><div><iframe allowfullscreen="true" data-embed-src="https://www.youtube.com/embed/Ld7HBpXwS0w?feature=oembed" frameborder="0" height="270" src="//melinyel.net/applications/core/interface/js/spacer.png" width="480"></iframe></div></div><p style="text-align:center;"><em>Merci à Mars073 pour l'uplod de la vidéo</em></p> <p> </p><p><strong>Remarque 1 : </strong>Il y a un problème au niveau de la texture sur l'arrière du cobaye. Il s'est scan tout seul et donc à eut du mal à faire l’arrière de la tête.</p><p>Si quelqu'un vous aide en passant lentement la kinect autour de vous, le résulta bien mieux.</p><p> </p><p><strong>Remarque 2 :</strong> Le deuxième scan est un livre sur un coussin. On reconnaît bien la couverture du livre<a href="http://a407.idata.over-blog.com/1/67/44/37/Kafka-sur-le-rivage.jpg" rel="external nofollow"> Kafka sur le rivage</a>, mais en s'approchant on remarque que c'est un peu flou et on ne peut pas lire correctement le titre.</p><p></p><p style="text-align:center;"><span style="font-size:18px;"><strong>4) Que faire avec un scan 3D ?</strong></span></p> <p>Vous pouvez arranger le rendu 3D directement depuis le logiciel Skanect ou bien sur des logiciels de 3D comme 3dsMax pour imprimer en 3D le résultat ( A voir : <iframe data-embed-src="<base_url>/topic/651-imprimante-3d-pas-cher/?do=embed" data-embedcontent="" frameborder="0" src="//melinyel.net/applications/core/interface/js/spacer.png"></iframe> ) </p><p>Vous pouvez également récupérer votre rendu 3D, faire un <a href="http://www.3dvf.com/forum/mesimages/38169/women_maillage_01.jpg" rel="external nofollow">maillage</a> avec 3dsMax ou autres et animer simplement votre personnage/objet avec Motion Builder 2014.</p><p>Je peux vous recommander d'aller voir les tuto de cette personne : <a href="https://www.youtube.com/watch?v=oWED-4qYwoY" rel="external nofollow">FrenchSchoolofCG</a></p><p> </p><p>Voila, j'attends vos retours.</p><p> </p><p>Pour la suite je souhaite faire un tuto sur :</p><ul><li>Utiliser Kinect comme Webcam</li><li>Utiliser des logiciels d'animation avec Kinect</li></ul>Bonus : Une vidéo que je trouve pas mal : Skanect 1.6 + blender <p></p><blockquote class="ipsStyle_spoiler" data-ipsspoiler=""><p>
</p><div class="ipsEmbeddedVideo" contenteditable="false"><div><iframe allowfullscreen="true" data-embed-src="https://www.youtube.com/embed/m_hBbJTKcL8?feature=oembed" frameborder="0" height="270" src="//melinyel.net/applications/core/interface/js/spacer.png" width="480"></iframe></div></div></blockquote><p></p>
-
<p><span style="color:#2f4f4f;"><span style="font-family:georgia, serif;">Bonjour à tous !</span></span></p>
<p> </p>
<p><span style="font-family:georgia, serif;"><span style="font-size:14px;"><span style="color:#2f4f4f;">Je connaissais cette "variante" de trap mais je ne m'y étais pas trop attardé dessus. </span></span></span></p>
<p><span style="font-family:georgia, serif;"><span style="font-size:14px;"><span style="color:#2f4f4f;">Finalement, c'est pas mal du tout ! Bon c'est pas officiellement le nom d'une variante de l'EDM c'est juste un nom qu'on lui a donné pour classifier des playlists je suppose, ou quelque chose comme ça.</span></span></span></p>
<p><span style="font-family:georgia, serif;"><span style="font-size:14px;"><span style="color:#2f4f4f;">Donc ! l'arabic trap. Ça ressemble à ça :</span></span></span></p>
<p> </p>
<p style="text-align:center;"><span style="font-family:georgia, serif;"><span style="font-size:14px;"><span style="color:#2f4f4f;">
</span></span></span></p><div class="ipsEmbeddedVideo" contenteditable="false"><div><iframe allowfullscreen="true" data-embed-src="https://www.youtube.com/embed/2NvGZCqGbe4?feature=oembed" frameborder="0" height="270" src="//melinyel.net/applications/core/interface/js/spacer.png" width="480"></iframe></div></div>
<p style="text-align:center;"> </p>
<p style="text-align:center;"><span style="font-family:georgia, serif;"><span style="font-size:14px;"><span style="color:#2f4f4f;">Ou encore :</span></span></span></p>
<p style="text-align:center;"> </p>
<p style="text-align:center;"><span style="font-family:georgia, serif;"><span style="font-size:14px;"><span style="color:#2f4f4f;">
</span></span></span></p><div class="ipsEmbeddedVideo" contenteditable="false"><div><iframe allowfullscreen="true" data-embed-src="https://www.youtube.com/embed/MMSXNoTeTlU?feature=oembed" frameborder="0" height="270" src="//melinyel.net/applications/core/interface/js/spacer.png" width="480"></iframe></div></div>
<p><span style="font-family:georgia, serif;"><span style="font-size:14px;"><span style="color:#2f4f4f;">Vous en pensez quoi ?</span></span></span></p>
<p> </p>
-
<p>Bonjour,</p><p>Voici un pack serveur (Source + Client) de Flyff v15 officiel (anglais avec juste quelques bug fixés).</p><p>Cette source est très stable mais ne contient aucune sécurité et aucun fix !</p><p><strong>Liens de téléchargement :</strong></p><p><b>Client officiel V15 :</b></p><p> • <a href="https://mega.nz/#!e5YyXRhY!jDXabG5vahyotAXdCLKbsfBiwMyGvFuPy3fNGptaF1U" rel="external nofollow">Mega</a> ou <a href="https://docs.google.com/uc?id=0B8xktnTcGNxfYlJwMVVVYTE0WFE" rel="external nofollow">Google Drive</a> ou <a href="http://www.gamefront.com/files/16113733/Flyff_US_Client_v15" rel="external nofollow">GameFront</a></p><p><strong>Flyff Repack :</strong></p><p> • 7z file (104 Mo) : <a href="https://mega.nz/#!6xYxSCiD!_TuFaOBfZ61qI7Hoq49AxrQatn5azPBT-LrGFax_uMA" rel="external nofollow">Mega</a> or <a href="http://www.mediafire.com/download/7de3q75qqjqbta9/Flyff+Repack+(v15)+(rev3.1).7z" rel="external nofollow">MediaFire</a></p><p> • Zip<span style="line-height:22.4px;"> file (174 Mo) : </span><a href="https://mega.nz/#!65JQ1Y5R!9JoIavfoen0EJ2XT1xbAF0sSVnfcieCMb7aprzKrlEI" rel="external nofollow">Mega</a><span style="line-height:22.4px;"> </span><span style="line-height:22.4px;">or </span><a href="http://www.mediafire.com/download/aw67a0a1k57is4w/Flyff+Repack+(v15)+(rev3.1).zip" rel="external nofollow">MediaFire</a></p><p> </p><p>Pour l'installation ou plus d'informations : <a href="https://forum.ragezone.com/f724/flyff-server-setup-guide-v15-1010044/" rel="external nofollow">https://forum.ragezone.com/f724/flyff-server-setup-guide-v15-1010044/</a></p><p><span style="font-size:11px;">Crédit : Cuvvvie</span></p><p></p>
-
<p>Bonjour,</p>
<p> </p>
<p>Je crée ce topic pour recenser les différentes erreurs de compilation des sources FagNet et si possible donner leur solution !</p>
<blockquote class="ipsQuote" data-ipsquote=""><div>
<p><span style="font-size:14px;"><span style="color:#ff8c00;"><strong><em><span style="margin:0px;">The</span><span style="margin:0px;"> type </span><span style="margin:0px;">or</span><span style="margin:0px;"> </span><span style="margin:0px;">namespace</span><span style="margin:0px;"> name </span><span style="margin:0px;">'MySqlConnection'</span><span style="margin:0px;"> could </span><span style="margin:0px;">not</span><span style="margin:0px;"> be found </span><span style="margin:0px;">(</span><span style="margin:0px;">are you missing a </span><span style="margin:0px;">using</span><span style="margin:0px;"> directive </span><span style="margin:0px;">or</span><span style="margin:0px;"> an assembly reference</span><span style="margin:0px;">?).</span></em></strong></span></span></p>
<p><span style="color:#008000;"><strong><u>Correction :</u></strong></span></p>
<p style="font-size:12px;"><em>On rencontre parfois cette erreur lorsque l'on essaie de compiler avec MSVS 2013.</em></p>
<p style="font-size:12px;"><em>Pour corriger ce problème il vous faut :</em></p>
<p style="font-size:12px;"><em>- Connector/Net 6.8.1 ou supérieur : <a href="http://dev.mysql.com/downloads/connector/net/" rel="external nofollow">http://dev.mysql.com/downloads/connector/net/</a></em></p>
<p style="font-size:12px;"><em>- Visual Studio 2011/12/13 Pro ou supérieur</em></p>
<p style="font-size:12px;"><em>- MySQL Visual Studio Plugin Beta 1.1.1 : <a href="https://cdn.mysql.com/Downloads/MySQLInstaller/mysql-visualstudio-plugin-1.1.1.msi" rel="external nofollow">https://cdn.mysql.com/Downloads/MySQLInstaller/mysql-visualstudio-plugin-1.1.1.msi</a></em></p>
<p style="font-size:12px;"><em>- Windows 7 ou supérieur.</em></p>
<p style="font-size:12px;"><em>Vous pouvez utilisez aussi une version supérieur de MySQL pour Visual Studio ; <a href="http://dev.mysql.com/downloads/windows/visualstudio/" rel="external nofollow">http://dev.mysql.com/downloads/windows/visualstudio/</a></em></p>
<p> </p>
</div></blockquote>
<p></p><p><span style="color:#ff0000;"><strong><u><span style="font-size:18px;">[Divers]</span></u></strong></span></p>
<p><strong><u>Pour compiler proprement il est bien de suivre la démarche suivante :</u></strong></p>
<p>Ouvrez la solution FagNet avec Visual Studio.</p>
<p>Puis :</p>
<p>1 - Dans le menu en haut, cliquez sur "Générer"</p>
<p>2 - Ouvrez "Gestionnaire de configurations"</p>
<p>3 - Dans "Configuration de la solution active" passer en mode "Release"</p>
<p>3 - Fait un clique droit sur "Solution FagNet" dans l'explorateur de solutions</p>
<p>4 - Faites "Nettoyer la solution"</p>
<p>5 - De nouveau clique droit sur "Solution FagNet"</p>
<p>6 - Faites "Générer la solution"</p>
<p>Suite à la compilation vous devrez avoir le message : (dans la box de sortie)</p>
<pre class="ipsCode prettyprint">
========== Génération : 5 a réussi, 0 a échoué, 0 mis à jour, 0 a été ignoré ========== </pre>
<p>Je mettrais à jour le sujet au fur et à mesure des différentes erreurs et corrections.</p>
<p> </p>
<p>Bye ! </p>
<p> </p>