Le Tunneling SSH : Sécuriser ses flux de données
-
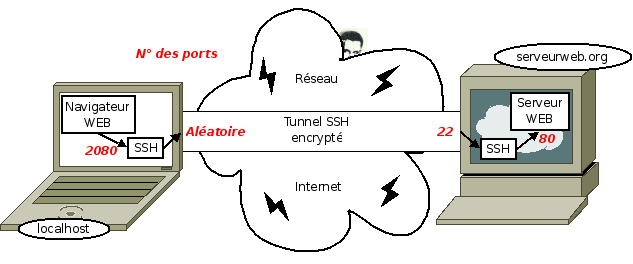
<p style="text-align: center;"><img alt="114713tunnelingssh.jpg" class="ipsImage" src="<base_url>/applications/sslimageproxy/interface/image.php?url=http://img15.hostingpics.net/pics/114713tunnelingssh.jpg"/></p><p style="text-align:justify"> </p><p style="text-align:justify"><span style="font-size:14px;"><span style="font-family: lucida sans unicode,lucida grande,sans-serif;">Dans la plupart des cas, on se sert uniquement de SSH pour <strong>gérer une machine Linux à distance</strong> mais le SSH réserve quelques secrets et notamment le <strong>Tunneling SSH</strong>, une notion un peu plus avancée que ce que nous avons l'habitude de faire avec le SSH mais reste néanmoins très pratique quand l'on sait l'utiliser correctement.</span></span></p><p style="text-align:justify"><span style="font-size:14px;"><span style="font-family: lucida sans unicode,lucida grande,sans-serif;"> </span></span></p><p style="text-align:justify"> </p><p style="text-align:justify"><span style="font-size:18px;"><span style="font-family: lucida sans unicode,lucida grande,sans-serif;"><b style="mso-bidi-font-weight:normal">1. Qu'est-ce que le « Tunneling SSH » ?</b></span></span></p><hr/><p style="text-align:justify"><span style="font-size:14px;"><span style="font-family: lucida sans unicode,lucida grande,sans-serif;">Le Tunneling SSH est un<strong> simple « tunnel » qui va être créé entre une machine et un utilisateur</strong> au même titre qu'une simple connexion SSH avoir la main sur une machine distante. Or nous allons utiliser ce « tunnel » pour<strong> faire passer des flux de données de manière totalement sécurisée</strong> ce qui peut éviter de passer par le SSL. </span></span></p><p style="text-align:justify"><span style="font-size:14px;"><span style="font-family: lucida sans unicode,lucida grande,sans-serif;">Mais il existe tout de même des contraintes. En effet, un défaut de configuration sur votre serveur SSH et <strong>un utilisateur mal intentionné pourrait accéder à votre machine et en prendre le contrôle total</strong>.</span></span></p><p style="text-align:justify"> </p><p style="text-align: center;"><span style="font-size:14px;"><span style="font-family: lucida sans unicode,lucida grande,sans-serif;"><img alt="253864.png" class="ipsImage" src="https://user.oc-static.com/files/253001_254000/253864.png"/></span></span></p><p style="text-align:justify"><span style="font-size:14px;"><span style="font-family: lucida sans unicode,lucida grande,sans-serif;"> </span></span></p><p style="text-align:justify"> </p><p style="text-align:justify"><span style="font-size:18px;"><span style="font-family: lucida sans unicode,lucida grande,sans-serif;"><b style="mso-bidi-font-weight:normal">2. Mise en place d'un « Tunneling SSH »</b></span></span></p><hr/><p style="text-align:justify"><span style="font-size:16px;"><span style="font-family: lucida sans unicode,lucida grande,sans-serif;"><b style="mso-bidi-font-weight:normal">1. Installation du daemon SSH</b></span></span></p><p style="text-align:justify"><span style="font-size:14px;"><span style="font-family: lucida sans unicode,lucida grande,sans-serif;"><span style="font-weight: normal;">Il vous faut obligatoirement un <strong>daemon SSH installé sur la machine distante</strong>. Pour tout savoir à ce sujet consultez ce sujet : </span><a href="<base_url>/topic/905-connexion-%C3%A0-distance-via-ssh/?do=findComment&comment=9486">Connexion à distance via SSH</a></span></span></p><pre class="html ipsCode prettyprint" data-pbcklang="html" data-pbcktabsize="4"><span style="font-size:14px;">sudo apt-get install openssh-server</span></pre><p> </p><h1 style="text-align:justify"><span style="font-size:16px;"><span style="font-family: lucida sans unicode,lucida grande,sans-serif;"><strong>2. Etablir une connexion sécurisée</strong></span></span></h1><ul><li><h1 style="text-align:justify"><span style="font-size:14px;"><span style="font-family: lucida sans unicode,lucida grande,sans-serif;"><strong>Sous Linux :</strong></span></span></h1></li></ul><h1 style="text-align:justify"><span style="font-size:14px;"><span style="font-family: lucida sans unicode,lucida grande,sans-serif;"><span style="font-weight: normal;">Rien de très compliqué, là encore notre ami le terminal est notre ami avec une simple commande :</span></span></span></h1><pre class="html ipsCode prettyprint" data-pbcklang="html" data-pbcktabsize="4"><span style="font-size:14px;"><span style="font-family: courier new,courier,monospace;">ssh -f user@server -L 2500:localhost:80 –N</span></span></pre><h1 style="text-align:justify"><span style="font-size:14px;"><span style="font-family: lucida sans unicode,lucida grande,sans-serif;"><span style="font-weight: normal;">Ici, j’établie une connexion SSH sur la machine « server » avec l’utilisateur « user » et je créé un tunnel SSH sur le port 2500 de mon ordinateur pointant sur le port 80 de la machine distante elle-même.</span></span></span></h1><h1 style="text-align:justify"><strong><span style="font-size:14px;"><span style="font-family: lucida sans unicode,lucida grande,sans-serif;"><span style="font-weight: normal;">Les options utilisées dans cette commande :</span></span></span></strong></h1><ul><li><h1 style="text-align:justify"><span style="font-size:14px;"><span style="font-family: lucida sans unicode,lucida grande,sans-serif;"><strong>-f :</strong><span style="font-weight: normal;"> Permet de mettre la session SSH en tâche de fond pour ne pas gêner.</span></span></span></h1></li><li><h1 style="text-align:justify"><span style="font-size:14px;"><span style="font-family: lucida sans unicode,lucida grande,sans-serif;"><strong>-L :</strong><span style="font-weight: normal;"> Initialise le tunnel SSH et son argument aura toujours la forme suivante : « port local : adresse IP de la cible : port de la cible ».</span></span></span></h1></li><li><h1 style="text-align:justify"><span style="font-size:14px;"><span style="font-family: lucida sans unicode,lucida grande,sans-serif;"><span style="font-weight: normal;"><span style="font-family: lucida sans unicode,lucida grande,sans-serif;"><strong><span lang="EN-US">-N :</span></strong><span lang="EN-US" style="font-weight: normal;"> « Do not execute a remote command ».</span></span></span></span></span></h1></li></ul><p> </p><ul><li><span style="font-size:14px;"><strong><span style="font-family: lucida sans unicode,lucida grande,sans-serif;">Avec putty :</span></strong></span></li></ul><p class="MsoNormal" style="text-align:justify"><span style="font-size:14px;"><span style="font-family: lucida sans unicode,lucida grande,sans-serif;"><span style="line-height: 107%;">Dans putty, vous devez ajouter un tunnel dans <strong>« Connection > SSH > Tunnels »</strong>. Dans la case <strong>« Source port »</strong>, entrez un <strong>port libre de votre ordinateur</strong> et dans la case <strong>« Destination »</strong>, entrez <strong>l’adresse IP de la cible suivit du port à écouter</strong> (127.0.0.1 :80 pour une connexion sur la machine distante sur le port 80).</span></span></span></p><p class="MsoNormal" style="text-align:justify"><span style="font-size:14px;"><span style="font-family: lucida sans unicode,lucida grande,sans-serif;"><span style="line-height: 107%;">Ensuite, connectez-vous normalement avec vos identifiants pour établir une connexion SSH avec la machine distante.</span></span></span></p><p class="MsoNormal" style="text-align:justify"> </p><p class="MsoNormal" style="text-align:justify"><span style="font-size:14px;"><span style="font-family: lucida sans unicode,lucida grande,sans-serif;"><span style="line-height: 107%;">Dès lors que votre connexion SSH est établie, vous pouvez accéder au flux de données sécurisé transitant dans le tunnel SSH. Dans le cas d’un flux http, dans votre navigateur, il vous suffit d’entrer 127.0.0.1 suivit du port source (127.0.0.1 :2500) pour accéder à votre site web de manière totalement sécurisée.</span></span></span></p><p class="MsoNormal" style="text-align:justify"> </p><p class="MsoNormal" style="text-align: center;"><span style="font-size:14px;"><span style="font-family: lucida sans unicode,lucida grande,sans-serif;"><span style="line-height: 107%;"><img alt="ssh-linux-23.jpg" class="ipsImage" src="<base_url>/applications/sslimageproxy/interface/image.php?url=http://www.it-connect.fr/wp-content-itc/uploads/2015/07/ssh-linux-23.jpg"/></span></span></span></p><p class="MsoNormal" style="text-align: center;"><span style="font-family:lucida sans unicode,lucida grande,sans-serif;"><em>
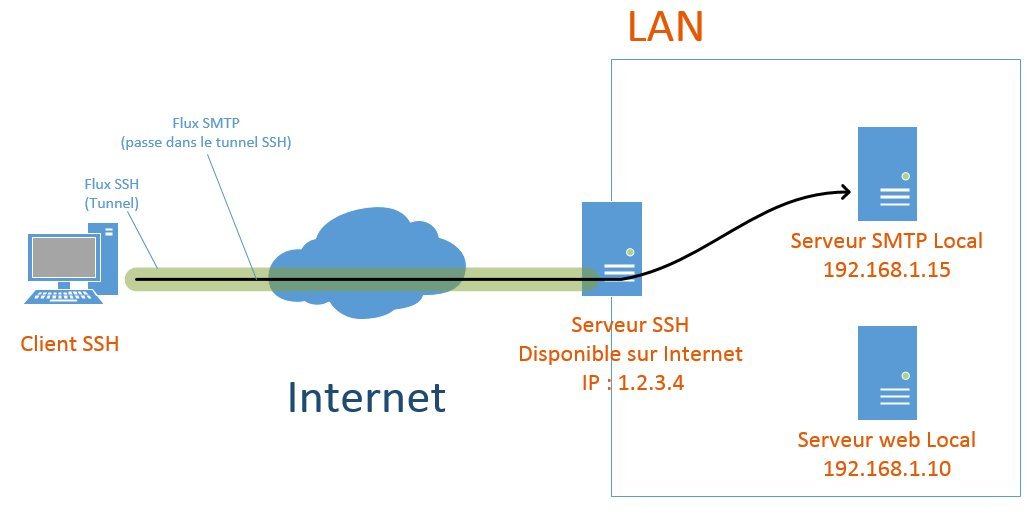
 IT-Connect</em></span></p><p class="MsoNormal" style="text-align: center;"> </p><p class="MsoNormal" style="text-align:justify"> </p><p class="MsoNormal"><span style="font-size:18px;"><strong><span style="font-family: lucida sans unicode,lucida grande,sans-serif;"><span style="line-height: 107%;">3. Quelques schémas d'une utilisation du </span>« Tunneling SSH »</span></strong></span></p><p class="MsoNormal"></p><hr/><p class="MsoNormal" style="text-align: center;"><em><span style="font-size:14px;"><span style="font-family: lucida sans unicode,lucida grande,sans-serif;"><span style="line-height: 107%;"><img alt="tunneling-ssh-05.jpg" class="ipsImage" height="497px" src="<base_url>/applications/sslimageproxy/interface/image.php?url=http://www.it-connect.fr/wp-content-itc/uploads/2015/07/tunneling-ssh-05.jpg" width="1000px"/></span></span></span></em></p><p class="MsoNormal" style="text-align: center;"><span style="font-family:lucida sans unicode,lucida grande,sans-serif;"><em> IT-Connect</em></span></p>


 On pourrait théoriquement mais ca serait un peu plus compliqué que ça <img alt=":)" src="emoticons/default_smile.png" title=":)"/></p>

Hello! It looks like you're interested in this conversation, but you don't have an account yet.
Getting fed up of having to scroll through the same posts each visit? When you register for an account, you'll always come back to exactly where you were before, and choose to be notified of new replies (either via email, or push notification). You'll also be able to save bookmarks and upvote posts to show your appreciation to other community members.
With your input, this post could be even better 💗
Register Login